# SAP connection - Enabling SNC encryption
The SAP Cryptographic Library is the default security product delivered by SAP for performing encryption functions in SAP Systems. You can use it for providing Secure Network Communications (SNC) between various SAP server components or for using the Secure Sockets Layer (SSL) protocol with the SAP application Server. In this guide, we will be going through how you can enable SNC in your own SAP instance and configuring your On-premise Agent to use SNC for encrypted communications.
The process follows 2 steps:
- Configuring the SAP cryptographic library in your SAP instance for SNC.
- Configuring SNC for the Workato OPA
# Configuring the SAP cryptographic library in your SAP instance for SNC
WARNING
You will need server side access to the machines hosting your SAP instance. This requires the downloading and installation of the SAP cryptographic library on the server. This is only needed if SAP Cryptolib is not already downloaded in your SAP system. Double check with your SAP team if this is not already done.
# 1. Install the SAP Cryptographic Library
To install the SAP cryptographic library, you will first need to obtain the SAP cryptographic library installation package. This can be found in the SAP support portal (opens new window). Head over to software downloads in the landing page and you'll be brought to the SAP one launchpad for Support.
Login credentials
You will need access to the SAP one launchpad. If you do not have such credentials, contact your SAP admin for support.
In the launchpad, head over to the top search bar and type in COMMONCRYPTOLIB 8 which should bring you to this screen.
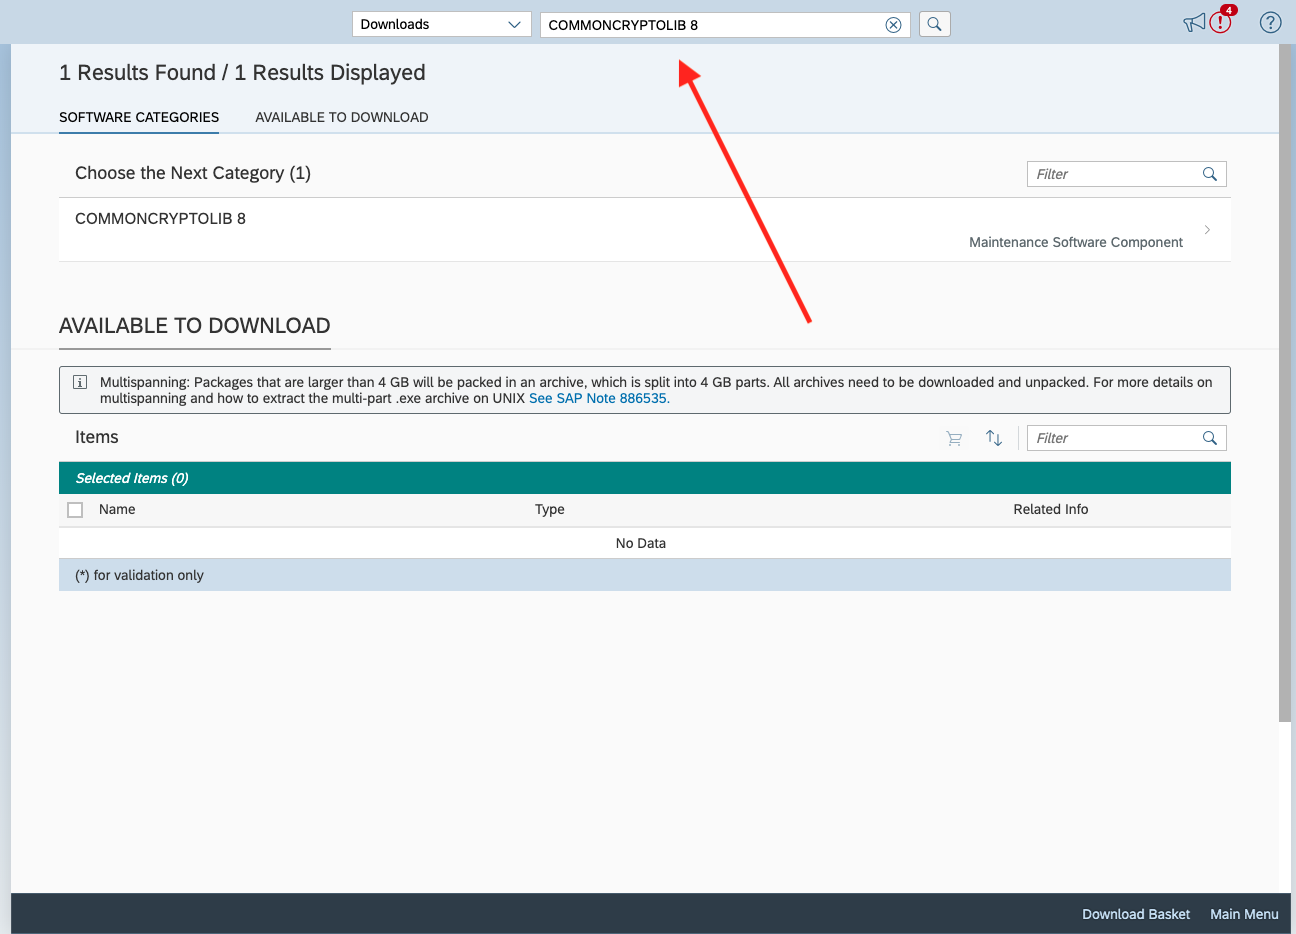
Select COMMONCRYPTOLIB 8 and select the latest patch. Ensure that the operating system selected matches that of the server hosting your SAP instance. In the example below, we have selected the latest patch 8530. Add this to your download basket and by clicking the shopping cart icon in the top right corner of the table.
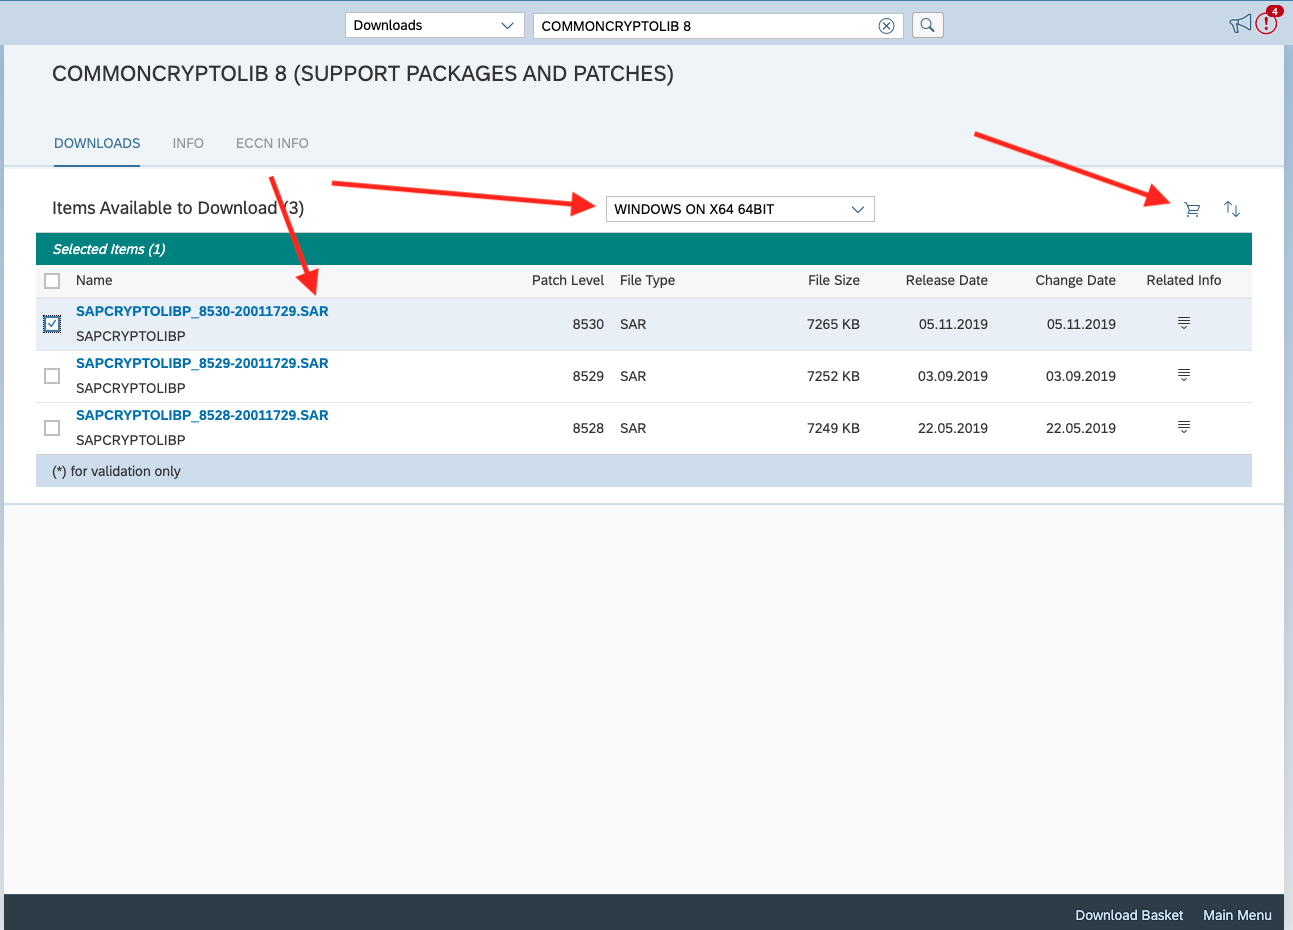
Head over to your download basket by clicking Download Basket at the bottom of the screen and select the file you just added to download it. You may be prompted to reenter your login credentials at this point.
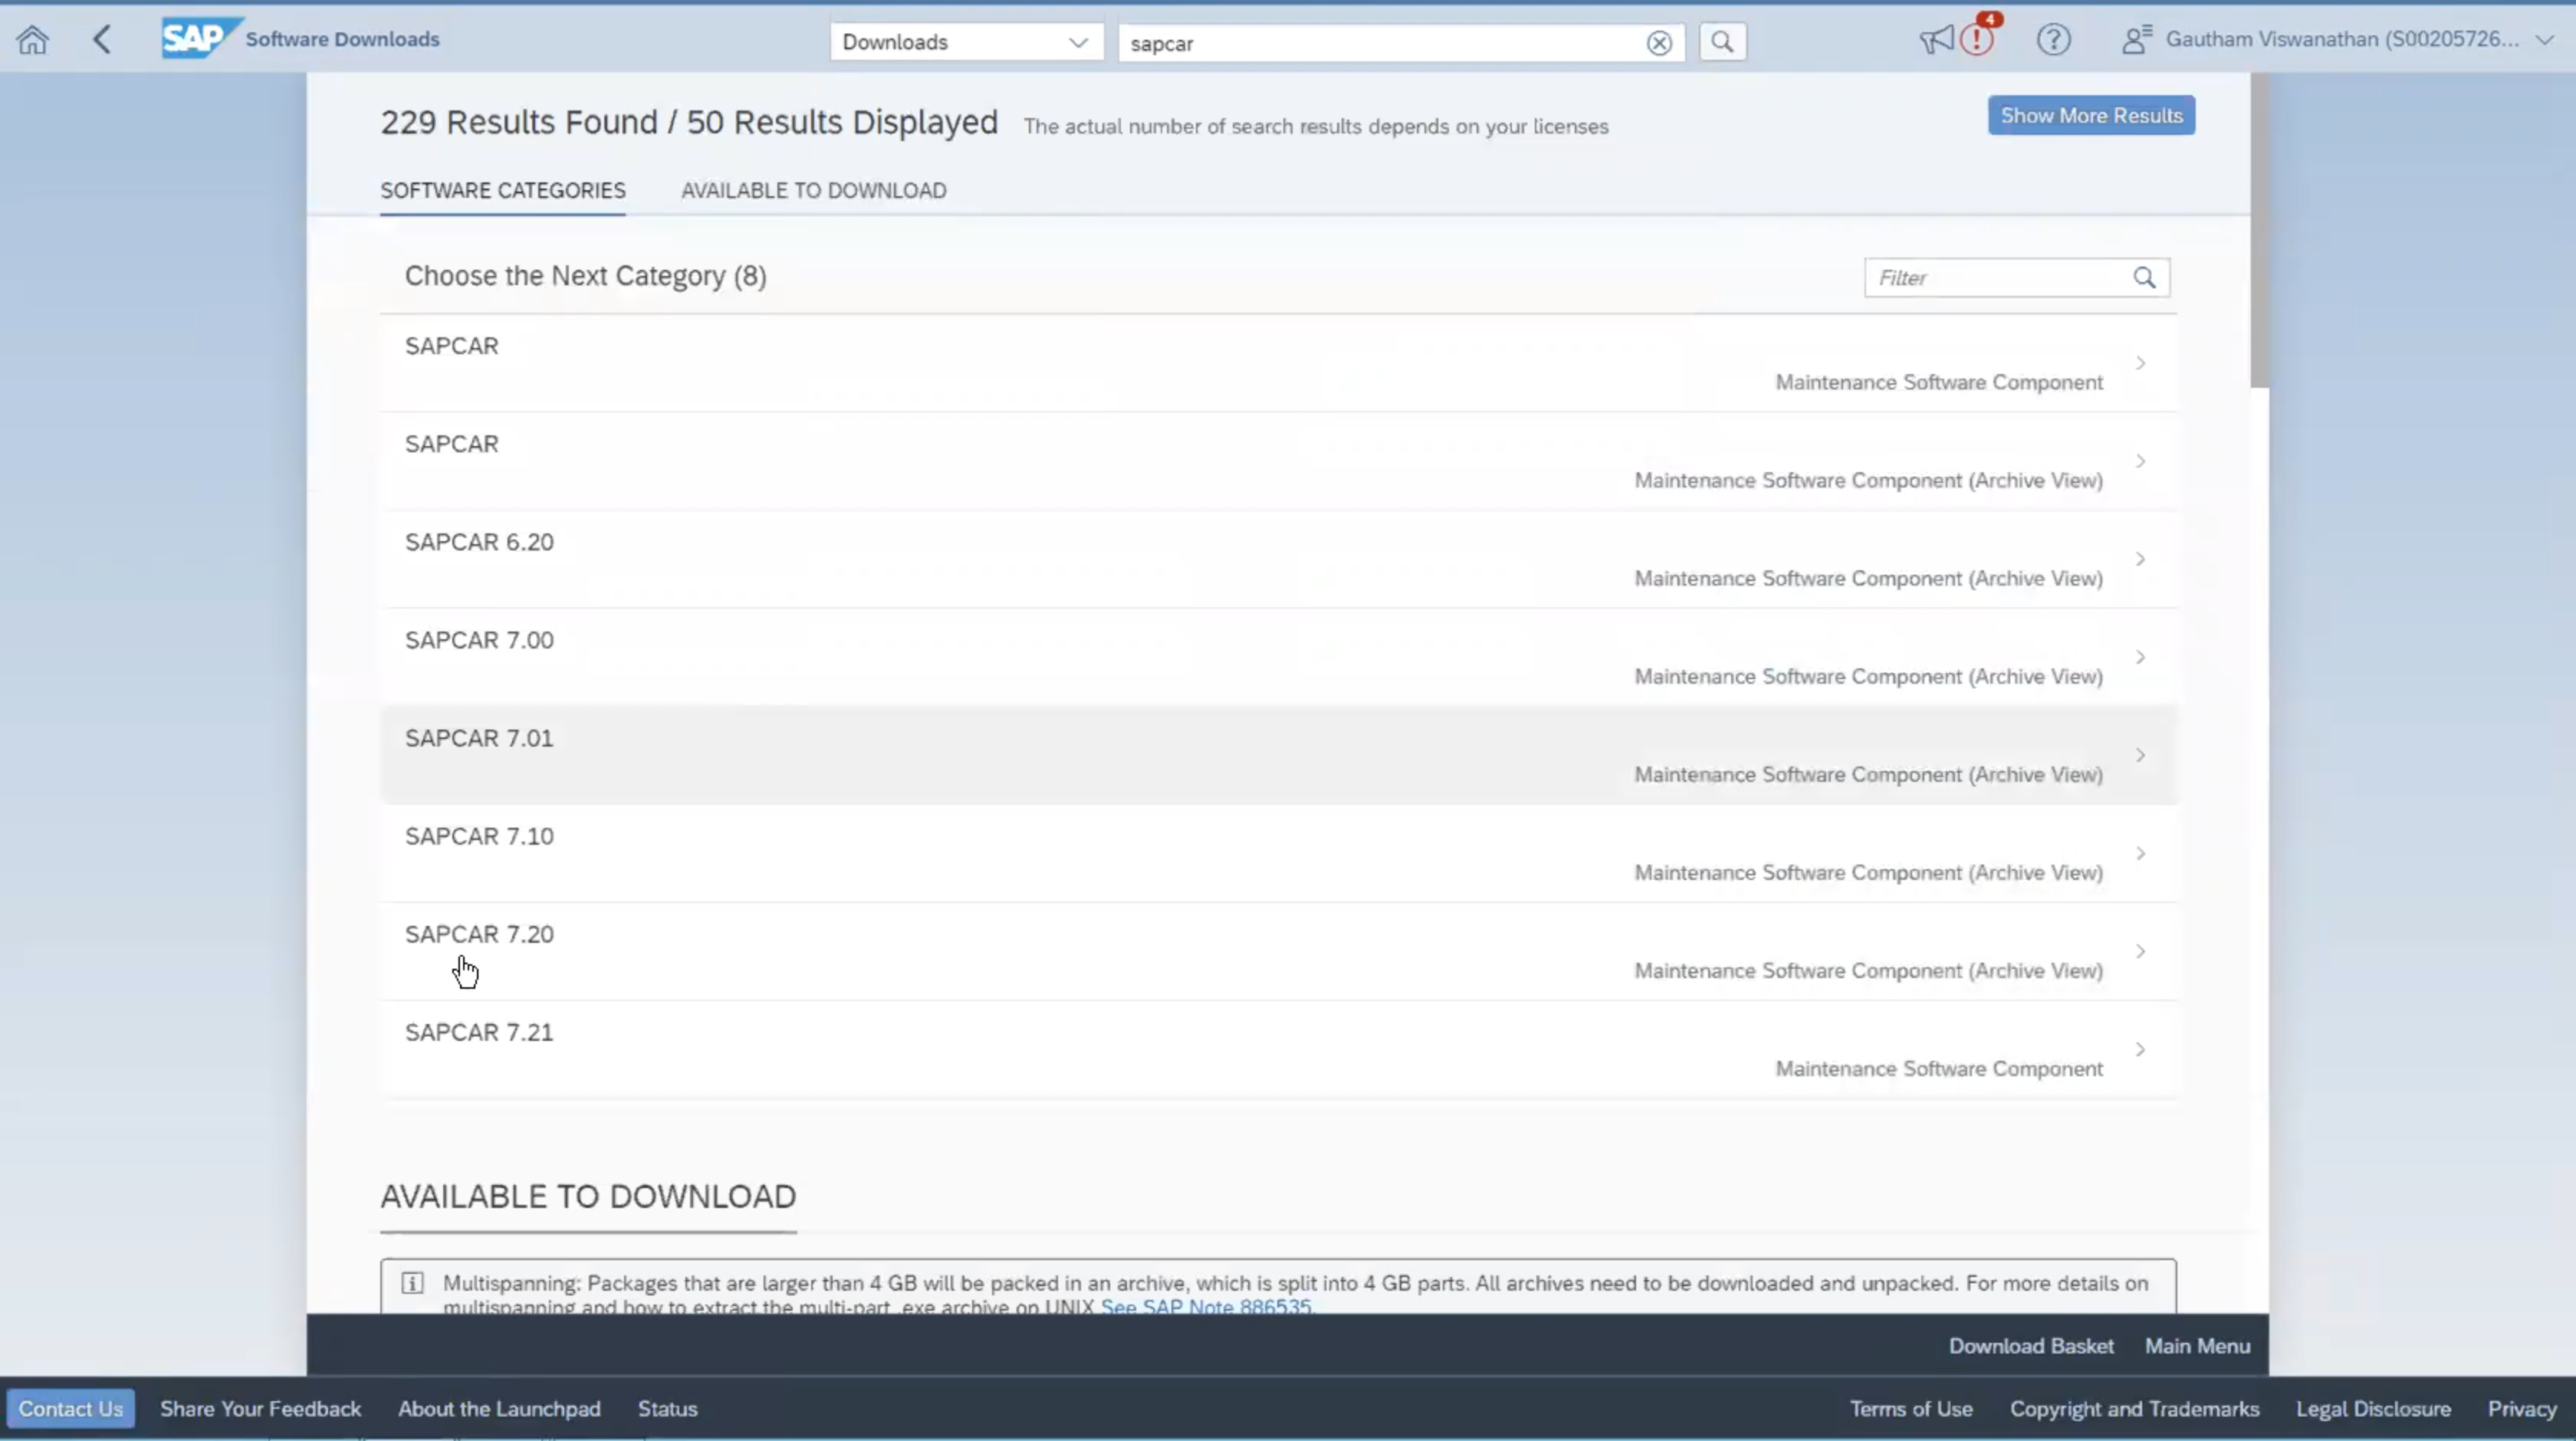
To extract the contents from the above package, you will need to search and download SAPCAR from the SAP support portal as well. Download the latest version of the SAPCAR which is Version 7.21 in this example.
# 2. Installing the Cryptographic Library on the SAP server
If sapcrypto.sar and SAPCAR are not already in your application server, please transfer both files to your application server.
As the user <sid>adm
- Extract the contents of the SAP Cryptographic Library installation package using
SAPCARby running the following command in terminal: Example: Windows NT:
.\SAPCAR.EXE -xvf .\sapcrypto.sar
The SAP Cryptographic Library installation package sapcrypto.sar should contain the following files:
- The SAP Cryptographic Library (
sapcrypto.dllfor Windows NT orlibsapcrypto.<ext>for UNIX) - The configuration tool
sapgenpse.exe
- Copy the library file and the configuration tool
sapgenpse.exeto the directory specified by the application server's profile parameterDIR_EXECUTABLE. In the following, we represent this directory with the notation$(DIR_EXECUTABLE).
Example: Linux:
DIR_EXECUTABLE: <DRIVE>:/sapmnt/LI1/exe
Location of folder to place SAP Cryptographic Library: <DRIVE>:/sapmnt/LI1/exe
Example: Windows NT:
DIR_INSTANCE: <DRIVE>:/usr/sap/<SID>/<instance>
Location of folder to place SAP Cryptographic Library: <DRIVE>:/usr/sap/<SID>/<instance>/exe
- Check the file permissions for the SAP Cryptographic Library. If, for example, you copied the library to its location using ftp on UNIX, then the file permissions may not be set correctly. Make sure that
<sid>adm(orSAPService<SID>under Windows NT) is able to execute the library's functions. - Copy the ticket file to the sub-directory sec in the instance directory
$(DIR_INSTANCE).
Example: Windows NT:
DIR_INSTANCE: <DRIVE>:/usr/sap/<SID>/<instance>
Location of the ticket: <DRIVE>:/usr/sap/<SID>/<instance>/sec
- Set the environment variable SECUDIR to the sec sub-directory. The application server uses this variable to locate the ticket and its credentials at run-time.
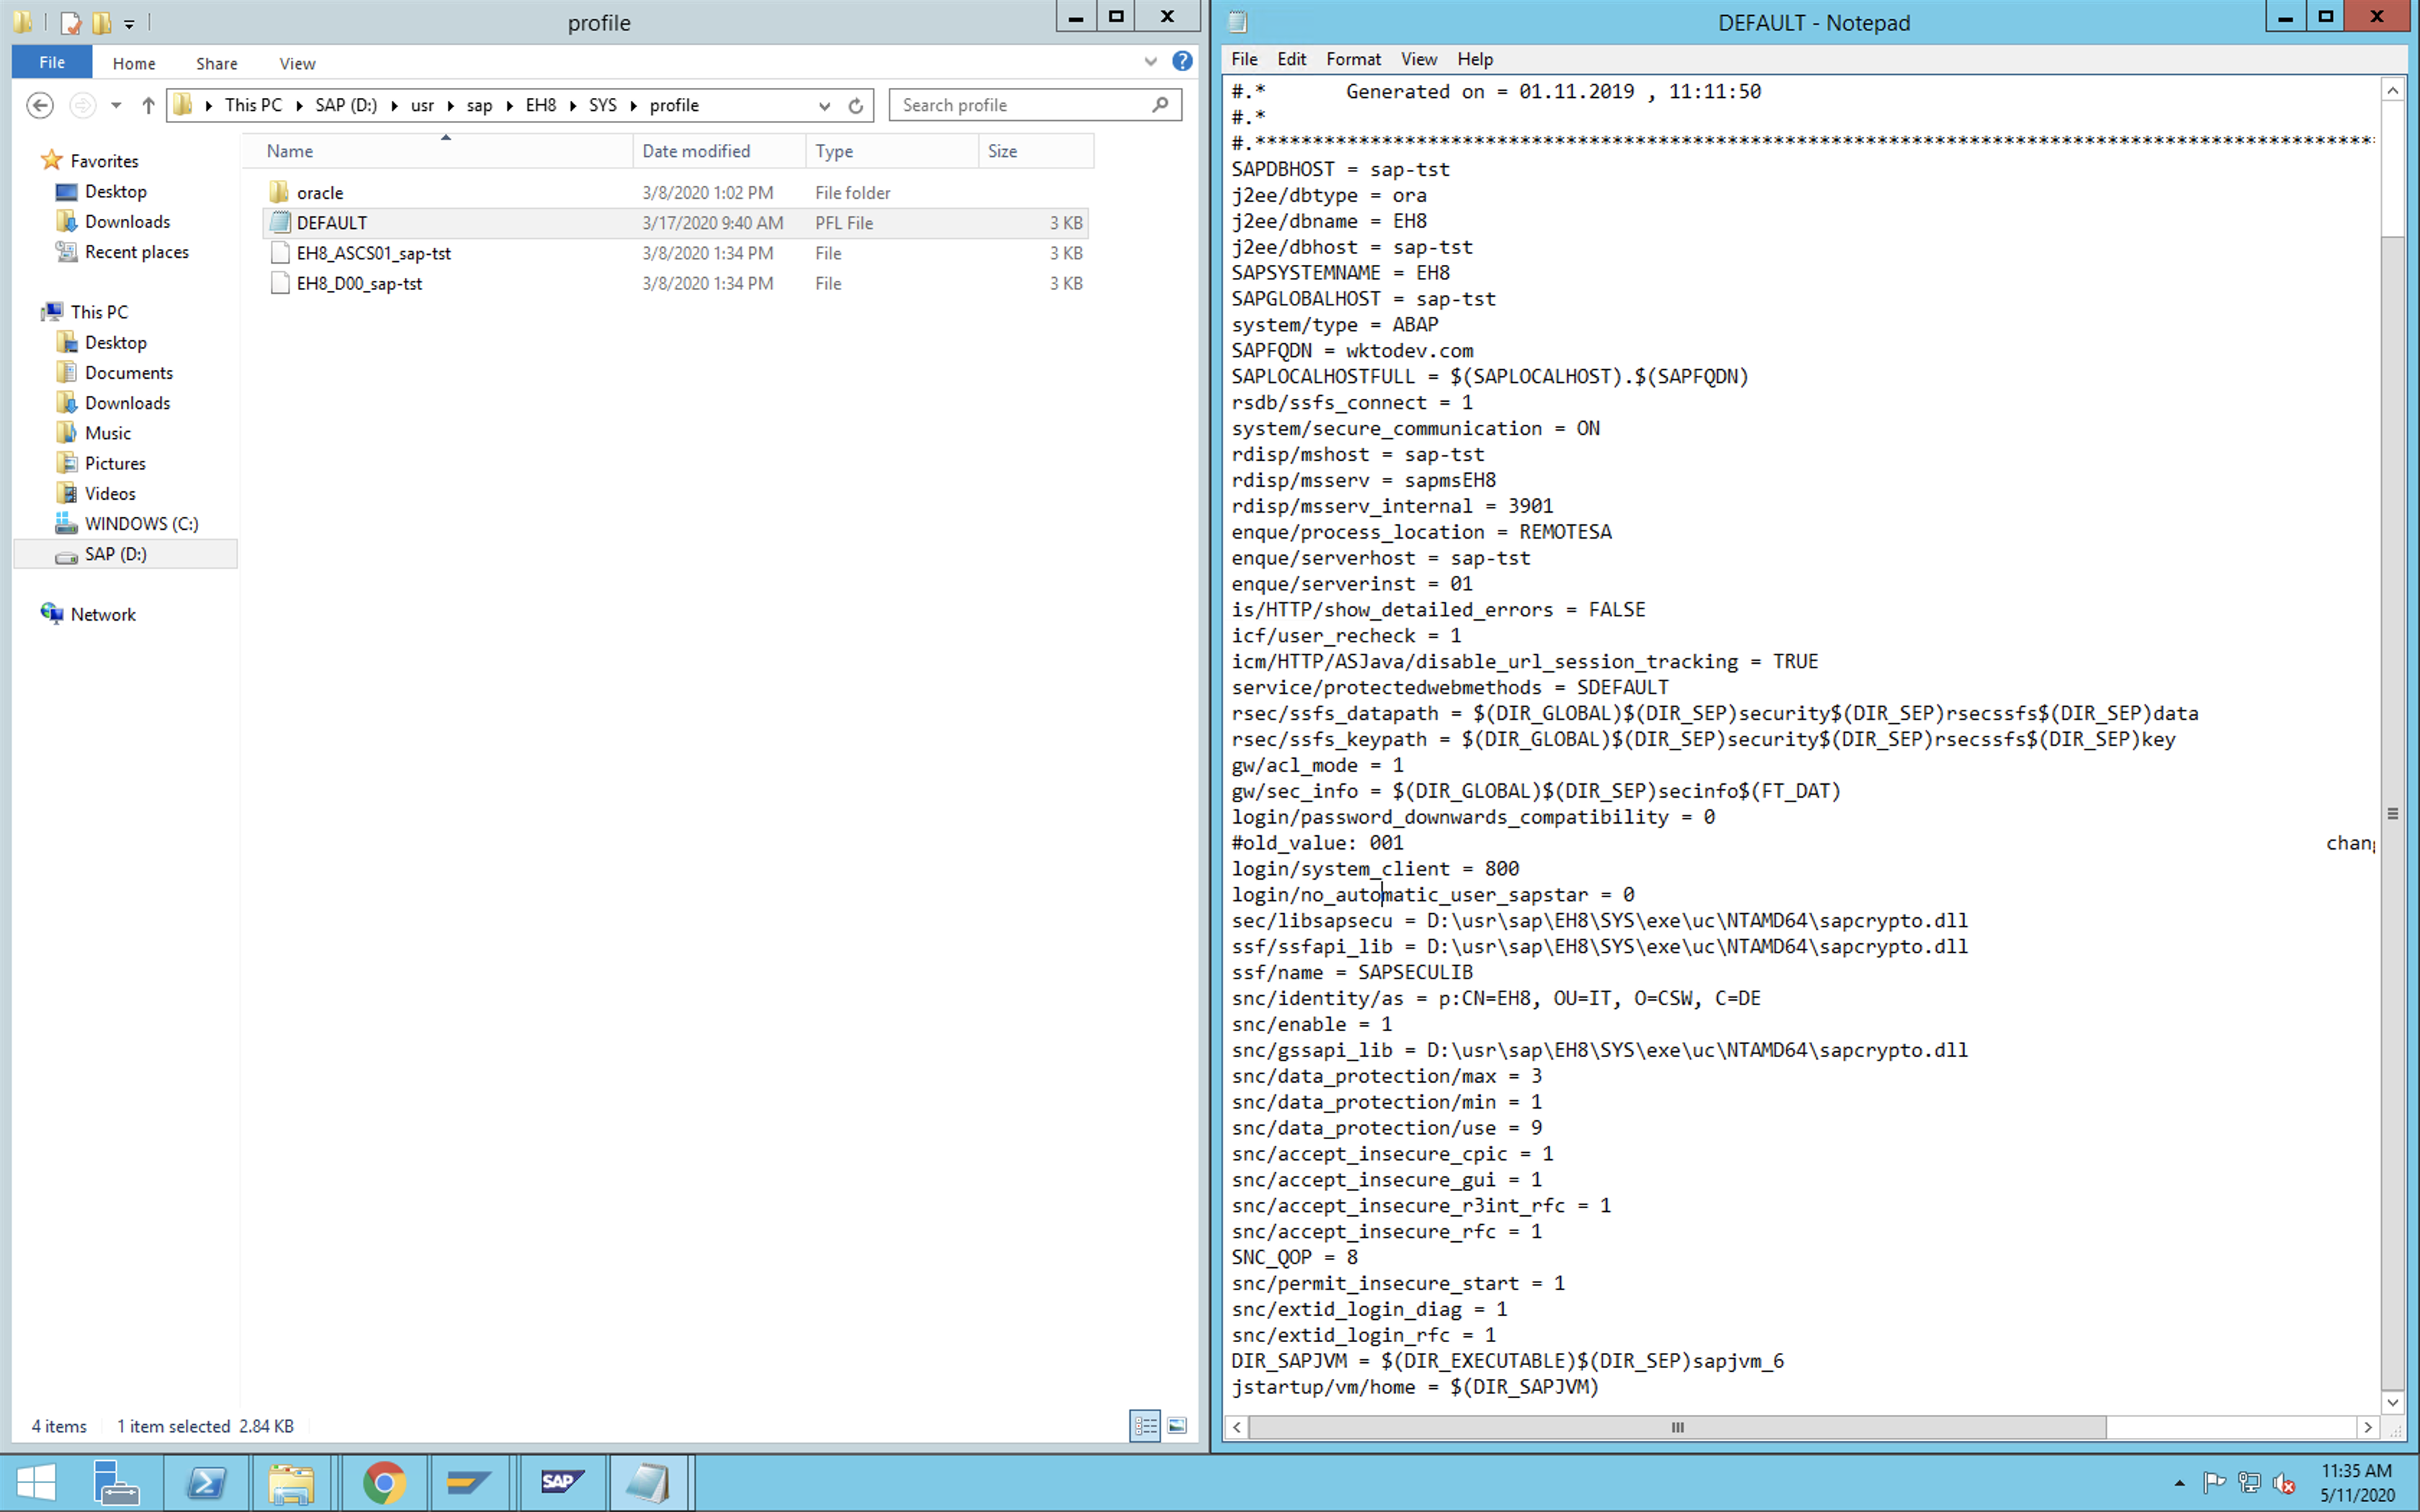
# 3. Set the trust manager profile parameters in your application server
Now we need to set the profile parameters so that the trust manager can access the SAP Cryptographic Library. Set the following profile parameters on each SAP AS ABAP instance by heading over to the profile setting file.
Example: Windows NT:
Location of the profile parameter settings: <DRIVE>:/usr/sap/<SID>/SYS/profile/default
| Profile parameters | Value | Example |
|---|---|---|
| sec/libsapsecu | Path and filename of the SAP Cryptographic Library | UNIX: /usr/sap/<SID>/SYS/exe/path/to/libsapcrypto.so Windows NT: <DRIVE>:\usr\sap\<SID>\SYS\exe\path\to\sapcrypto.dll |
| ssf/ssfapi_lib | Path and filename of the SAP Cryptographic Library | UNIX: /usr/sap/<SID>/SYS/exe/path/to/libsapcrypto.so Windows NT: <DRIVE>:\usr\sap\<SID>\SYS\exe\path\to\sapcrypto.dll |
| ssf/name | SAPSECULIB | SAPSECULIB |
| snc/enable | 1 | 1 |
| snc/gssapi_lib | Path and filename where the SAP Cryptographic Library is located | UNIX: /usr/sap/<SID>/SYS/exe run/ libsapcrypto.so Windows NT: <DRIVE>:\usr\sap\<SID>\SYS\ exe\run\sapcrypto.dll |
| snc/identity/as | Application server's SNC name Syntax: p:<Distinguished_Name> The Distinguished Name part must match the Distinguished Name that you specify when creating the SNC PSE. | p:CN=ABC, OU=Test, O=MyCompany, C=US |
| snc/data_protection/max | 1: Authentication only 2: Integrity protection 3: Privacy protection | 3 |
| snc/data_protection/min | 1: Authentication only 2: Integrity protection 3: Privacy protection | 1 |
| snc/data_protection/use | 1: Authentication only 2: Integrity protection 3: Privacy protection 9: Use the value from snc/data_protection/max | 9 |
| snc/accept_insecure_cpic | 0: do not accept 1: accept | 1 |
| snc/accept_insecure_gui | 0: do not accept 1: accept | 1 |
| snc/accept_insecure_r3int_rfc | 0: do not accept 1: accept | 1 |
| snc/accept_insecure_rfc | 0: do not accept 1: accept | 1 |
Now, restart the application server for your changes to come into effect.
WARNING
Set the profile parameter snc/enable to 1 activates SNC on the application server. If this parameter is set but the SNC PSE and credentials do not exist, then the application server will not start. Therefore, setting the SNC parameters should be the last step in the configuration procedure
# Sample SNC parameters
snc/identity/as = p:CN=EH8, OU=I0021153659, OU=SAP Web AS, O=SAP Trust Community, C=DE
ssf/name = SAPSECULIB
ssf/ssfapi_lib = D:\usr\sap\EH8\SYS\exe\uc\NTAMD64\sapcrypto.dll
sec/libsapsecu = D:\usr\sap\EH8\SYS\exe\uc\NTAMD64\sapcrypto.dll
snc/enable = 1
snc/gssapi_lib = D:\usr\sap\EH8\SYS\exe\uc\NTAMD64\sapcrypto.dll
spnego/krbspnego_lib = D:\usr\sap\EH8\SYS\exe\uc\NTAMD64\sapcrypto.dll
snc/data_protection/max = 3
snc/data_protection/min = 1
snc/data_protection/use = 9
snc/accept_insecure_cpic = 1
snc/accept_insecure_gui = 1
snc/accept_insecure_r3int_rfc = 1
snc/accept_insecure_rfc = 1
SNC_QOP = 8
snc/permit_insecure_start = 1
snc/extid_login_diag = 1
snc/extid_login_rfc = 1
DIR_SAPJVM = $(DIR_EXECUTABLE)$(DIR_SEP)sapjvm_6
jstartup/vm/home = $(DIR_SAPJVM)
# 4. Create a PSE and self-signed public-key certificate on SAP application server
Using the trust manager in the SAP GUI
- Go to the trust manager (T-code STRUST)
- Select the SNC PSE node. In the example below, we have it named as
SNC SAPCrytolib
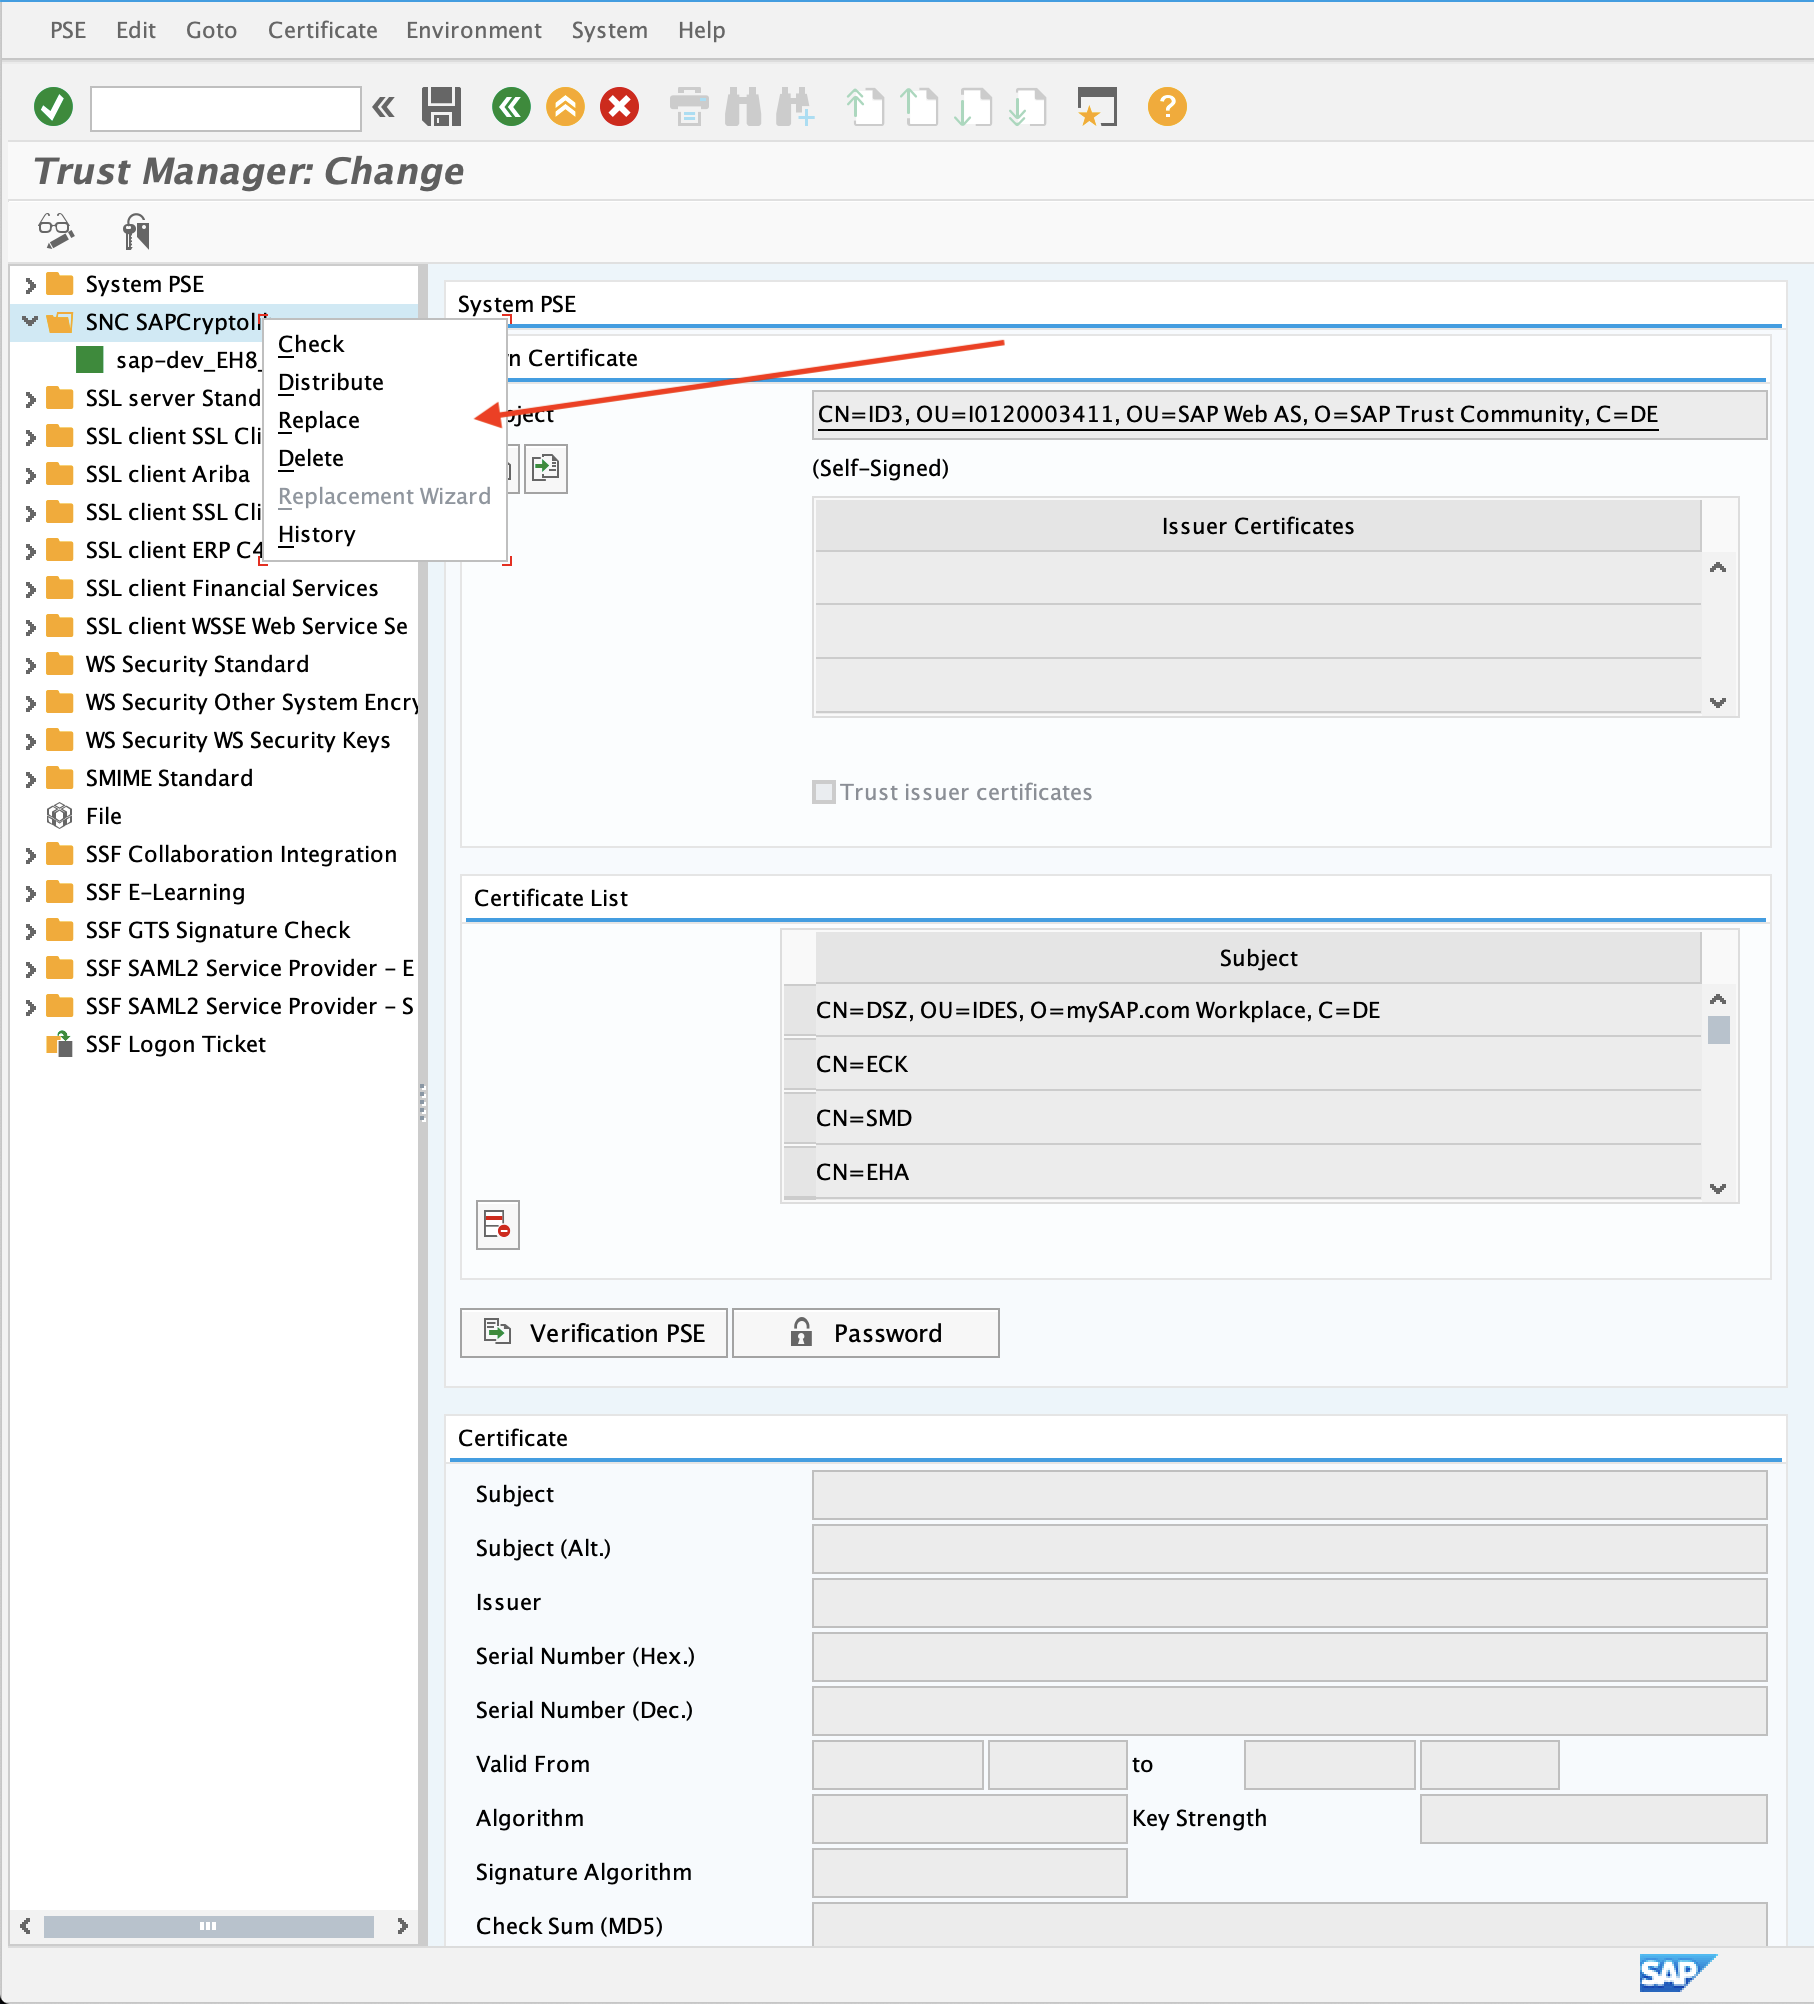
- Right click to open the context menu and select
Create(if no PSE exists) orReplace. - If the server's SNC name is defined in the profile parameter
snc/identity/as, then the system automatically determines the Distinguished Name accordingly. Otherwise, enter the Distinguished Name parts in the corresponding fields, for example:
- Name =
<SID> - Org. (opt.) = Test
- Comp./Org. = MyCompany
- Country = US
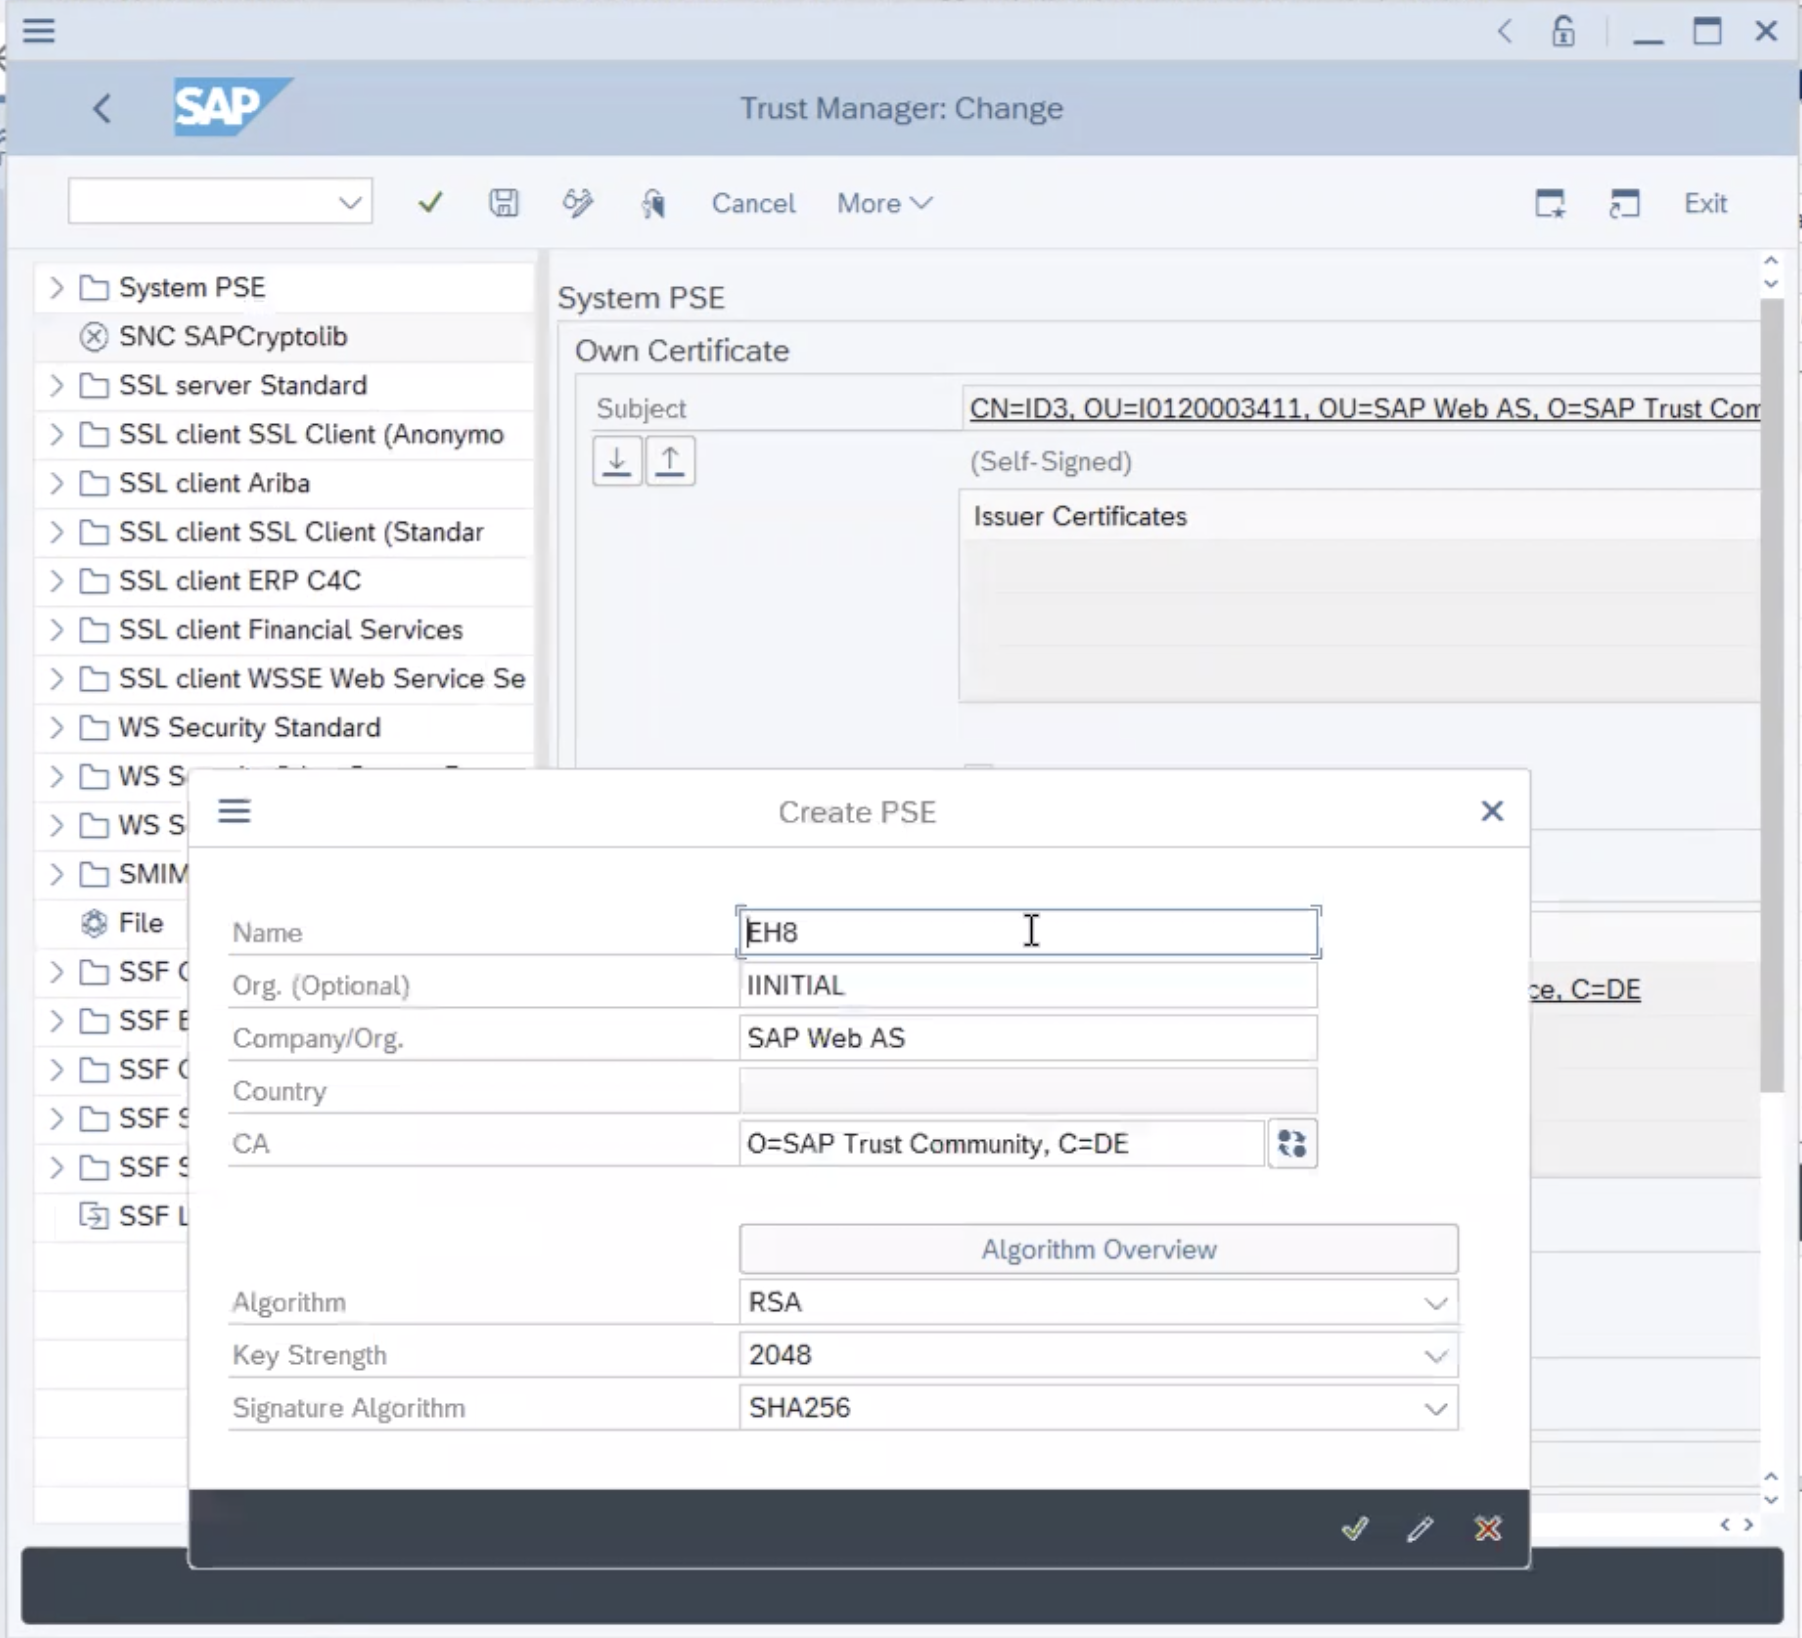
- Choose
Enterto return to the Trust Manager screen. - For SNC, you must assign a password to the PSE. Choose Assign password. The PSE dialog appears.

- Enter a password for the PSE and choose Enter. You return to the Trust Manager screen
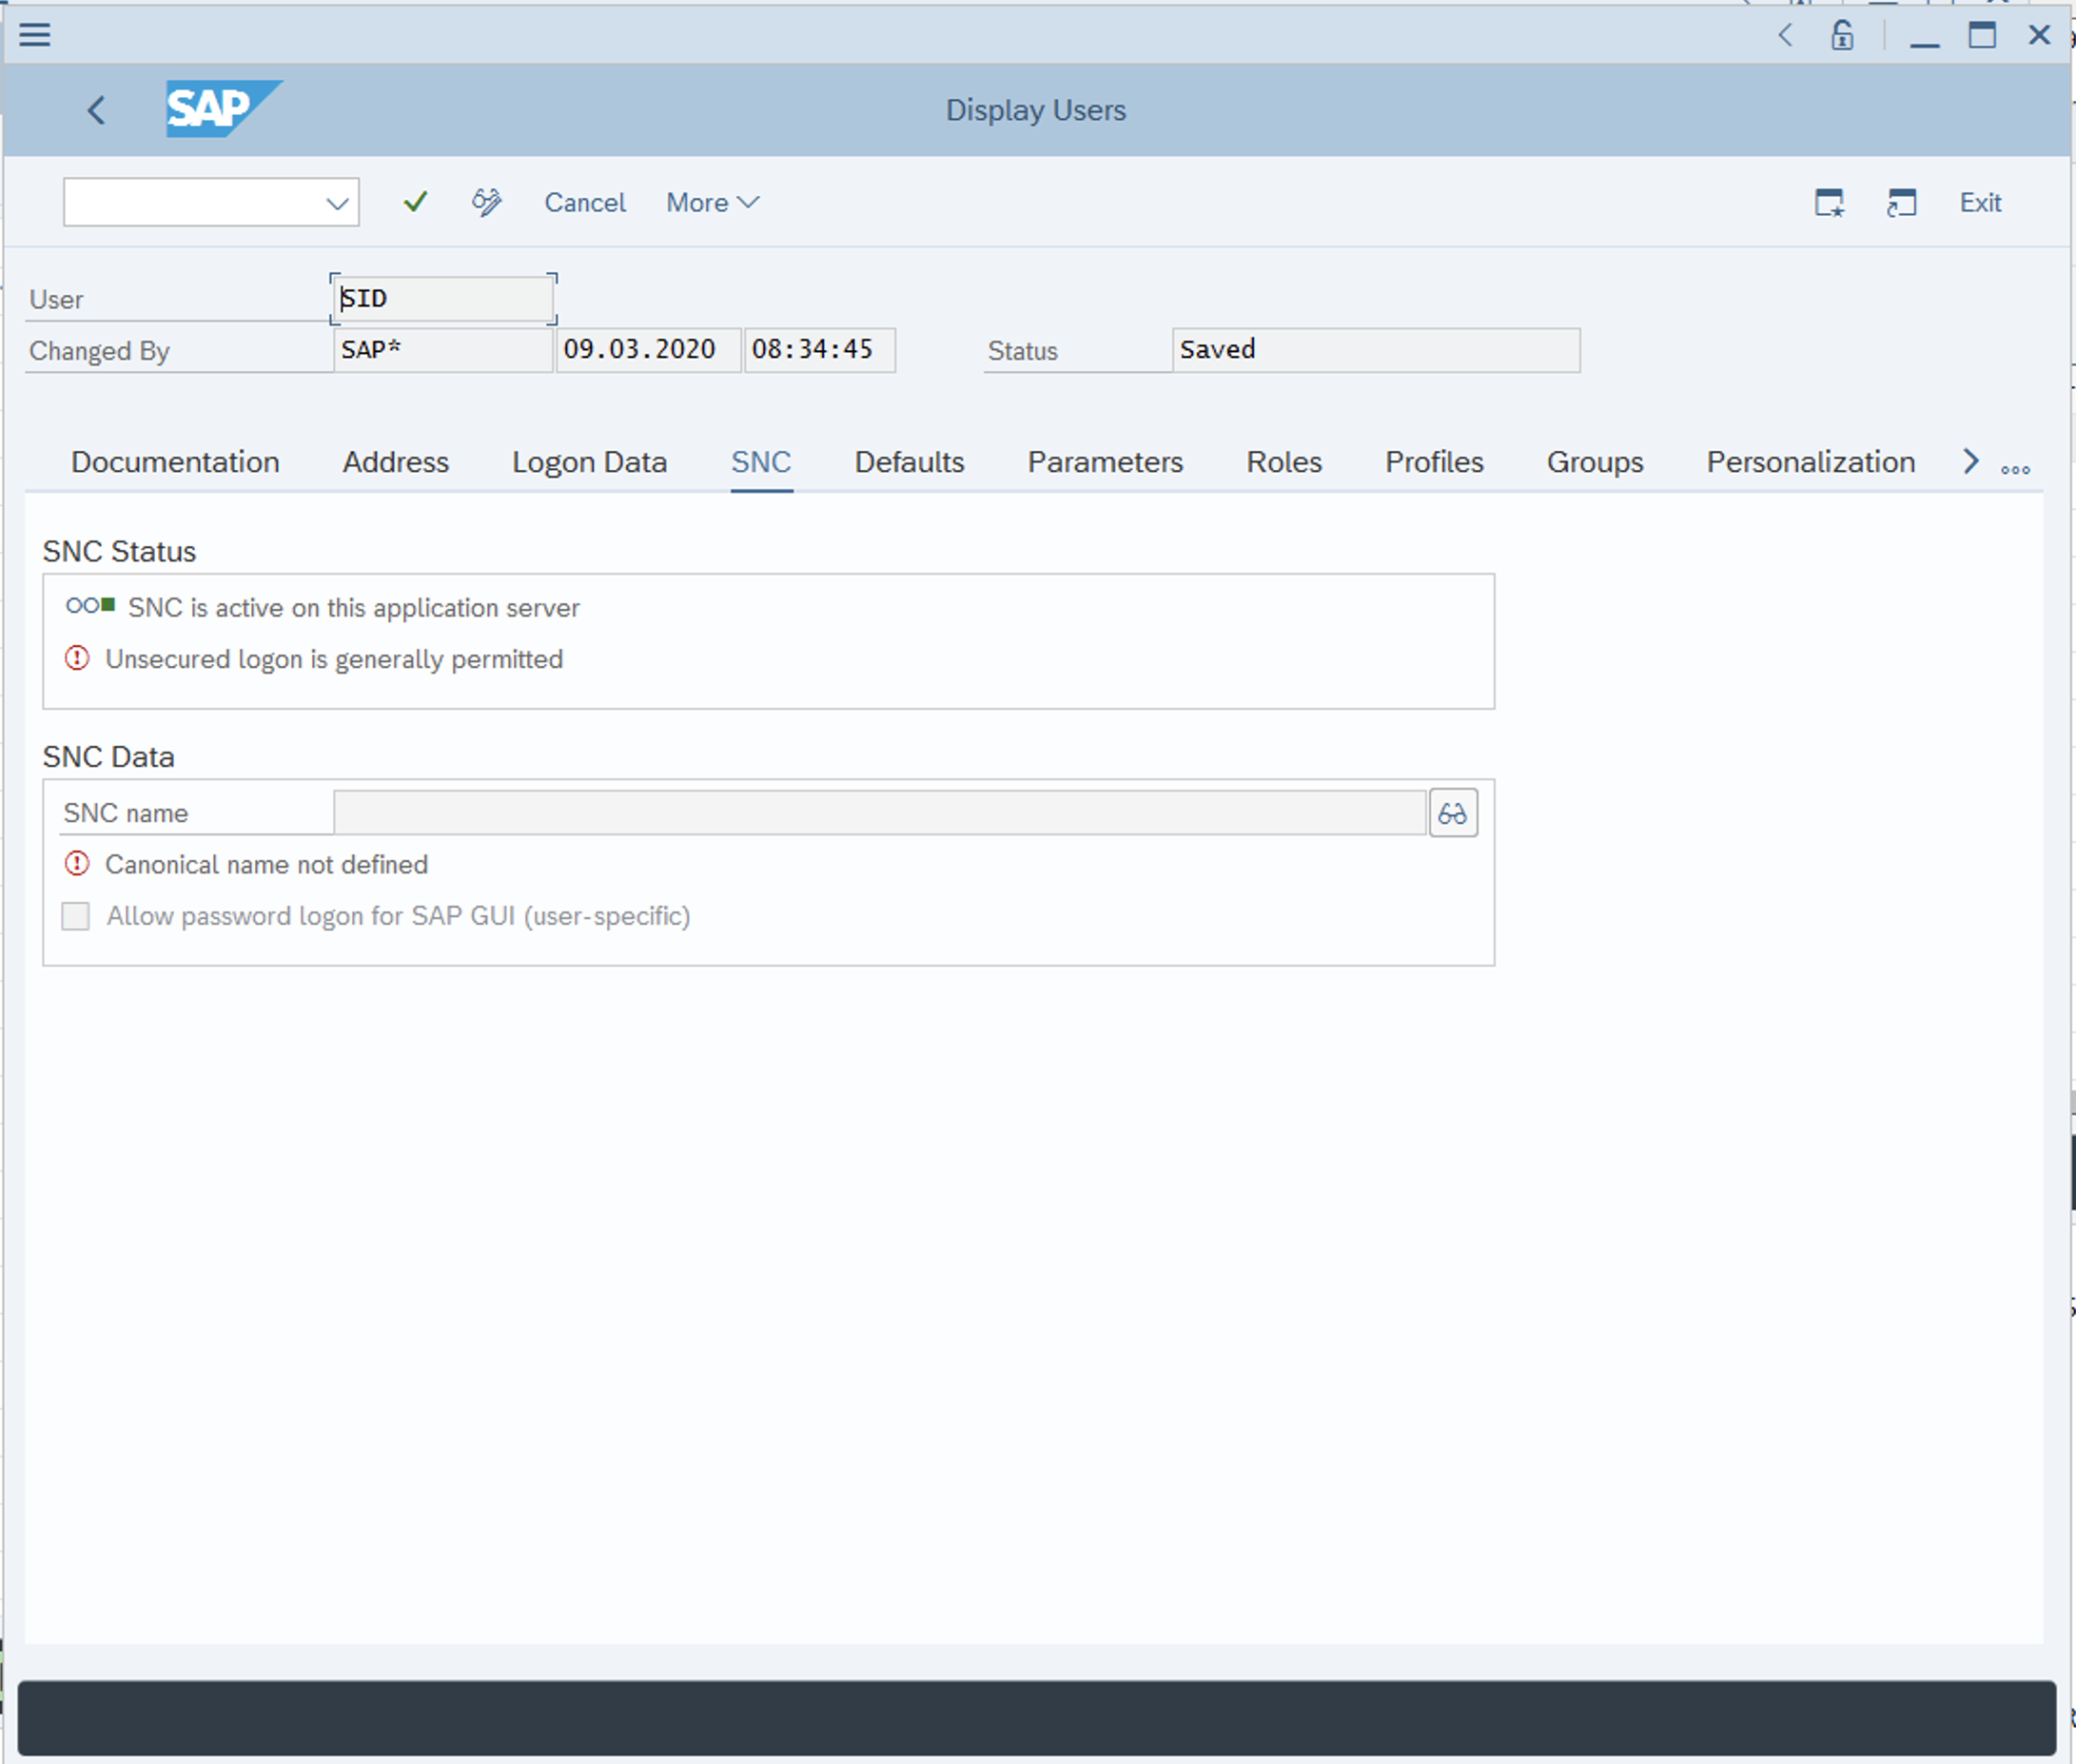
Once done, The system creates the SNC PSE and distributes it to the individual application servers. The system protects the PSE with a password and creates credentials for the server so that it can access the PSE at run-time. After this is done, SNC is now enabled for your SAP server! You can double check by going to TCODE SU01 and checking any user. Under the SNC tab, you should see the SNC status as active.
Note
If the SAP system has several hosts, then you can create a single PSE on one host and copy it to the other hosts.
# Configuring SNC for the Workato OPA
WARNING
This assumes you have already set up your OPA with all the necessary files to establish an unencrypted connection to your SAP system.
# 1. Retrieving SAP commoncryptolib and SAPCAR
Similar to step 1 of configuring SNC on your SAP system, you will need to download SAP commoncryptolib 8 and SAPCAR. You will first need to obtain the SAP cryptographic library installation package. This can be found in the SAP support portal (opens new window). Head over to software downloads in the landing page and you'll be brought to the SAP one launchpad for Support.
Login credentials
You will need access to the SAP one launchpad. If you do not have such credentials, contact your SAP admin for support.
In the launchpad, head over to the top search bar and type in COMMONCRYPTOLIB 8 which should bring you to this screen.
Select COMMONCRYPTOLIB 8 and select the latest patch. Ensure that the operating system selected matches that of the server hosting your SAP instance. In the example below, we have selected the latest patch 8530. Add this to your download basket and by clicking the shopping cart icon in the top right corner of the table.
Head over to your download basket by clicking Download Basket at the bottom of the screen and select the file you just added to download it. You may be prompted to reenter your login credentials at this point.
To extract the contents from the above package, you will need to search and download SAPCAR from the SAP support portal as well. Download the latest version of the SAPCAR which is Version 7.21 in this example.
Move these files over to the server hosting your Workato OPA. In cases of Windows and Mac, you could download these files directly if your server has internet connectivity. In the case of linux, you will need to copy these files over.
Example: Linux:
- Copy over SAPCAR.EXE file Command input:
scp SAPCAR_1311-80000935.EXE user@your_server:~/
- Copy over SAPCRYPTOLIB.SAR file Command input:
scp SAPCRYPTOLIBP_8531-20011697.SAR user@your_server:~/
# 2. Unpacking the SAP commoncryptolib using SAPCAR on your OPA's server
On the server running your OPA, you will need to unpack the SAP commoncryptolib.
Example: Linux
- Make SAPCAR executable Terminal input:
chmod +x SAPCAR_1311-70002712.EXE
- Rename SAPCAR file (optional) Terminal input:
mv SAPCAR_1311-70002712.EXE sapcar
- Use SAPCAR to unpack SAPCRYPTOLIB Terminal input:
./sapcar -xf SAPCRYPTOLIBP_8531-20011697.SAR
Expected output:
SAPCAR: processing archive SAPCRYPTOLIBP_8531-20011697.SAR (version 2.01)
SAPCAR: 6 files extracted
Example: Mac
- Make SAPCAR executable Terminal input:
chmod +x SAPCAR_1311-70002712.EXE
- Rename SAPCAR file (optional) Terminal input:
mv SAPCAR_1311-70002712.EXE sapcar
- Use SAPCAR to unpack SAPCRYPTOLIB Terminal input:
./sapcar -xf SAPCRYPTOLIBP_8531-20011697.SAR
Expected output:
SAPCAR: processing archive SAPCRYPTOLIBP_8531-20011697.SAR (version 2.01)
SAPCAR: 4 files extracted
Example: Windows
- Rename SAPCAR file (optional) Terminal input:
ren SAPCAR_1311-70002712.EXE sapcar.exe
- Use SAPCAR to unpack SAPCRYPTOLIB Command line input
.\sapcar.exe -xvf .\sapcrypto.sar
Expected output
SAPCAR: processing archive SAPCRYPTOLIBP_8531-20011697.SAR (version 2.01)
SAPCAR: 4 files extracted
# 3. Creating the "Sec" folder
Create a folder called "sec" in your server. This folder will be used to hold files required for SNC connections. This can be placed inside your OPA folder or in a separate folder altogether.
Example: Linux
- Make
secfolder Terminal input
mkdir sec
- Move libsapcrypto.so (opens new window) to sec folder Terminal input
mv libsapcrypto.so sec
- Move lib.so (opens new window) to sec folder Terminal input
mv libslcryptokernel.so sec
- Move sapgenpse to sec folder Terminal input
mv sapgenpse sec
# 4. Set the SECUDIR and SNC_LIB variables
Set the SECUDIR and SNC_LIB environment variables. These variables tell the server where to look for the certificates required for an SNC encrypted login and which file is used as the SAP crypto library.
# Example Linux:
- Set the
SECUDIRvariable.
Terminal input:
export SECUDIR=~/sec
- Confirm that its been set.
Terminal input:
echo $SECUDIR
Expected output
~/sec
- Set the
SNC_LIBvariable.
Terminal input:
export SNC_LIB=~/sec/libsapcrypto.dylib
# 5. Export the SAP SNC certificate
Export the SAP Certificate from the application server to be imported to the OPA. This is the certificate created when setting up SNC on your SAP server. This certificate is needed to create a an RFC.pse file later on which your OPA will use to establish access with your SAP server.
Using the trust manager in the SAP GUI
- Go to the trust manager (T-code STRUST)
- Select the SNC PSE node. In the example below, we have it named as
SNC SAPCrytolib - Double select the certificate in the
Own Certificatesection.

- Choose PSE Export under the
Certificatesection. Select Base64 format.
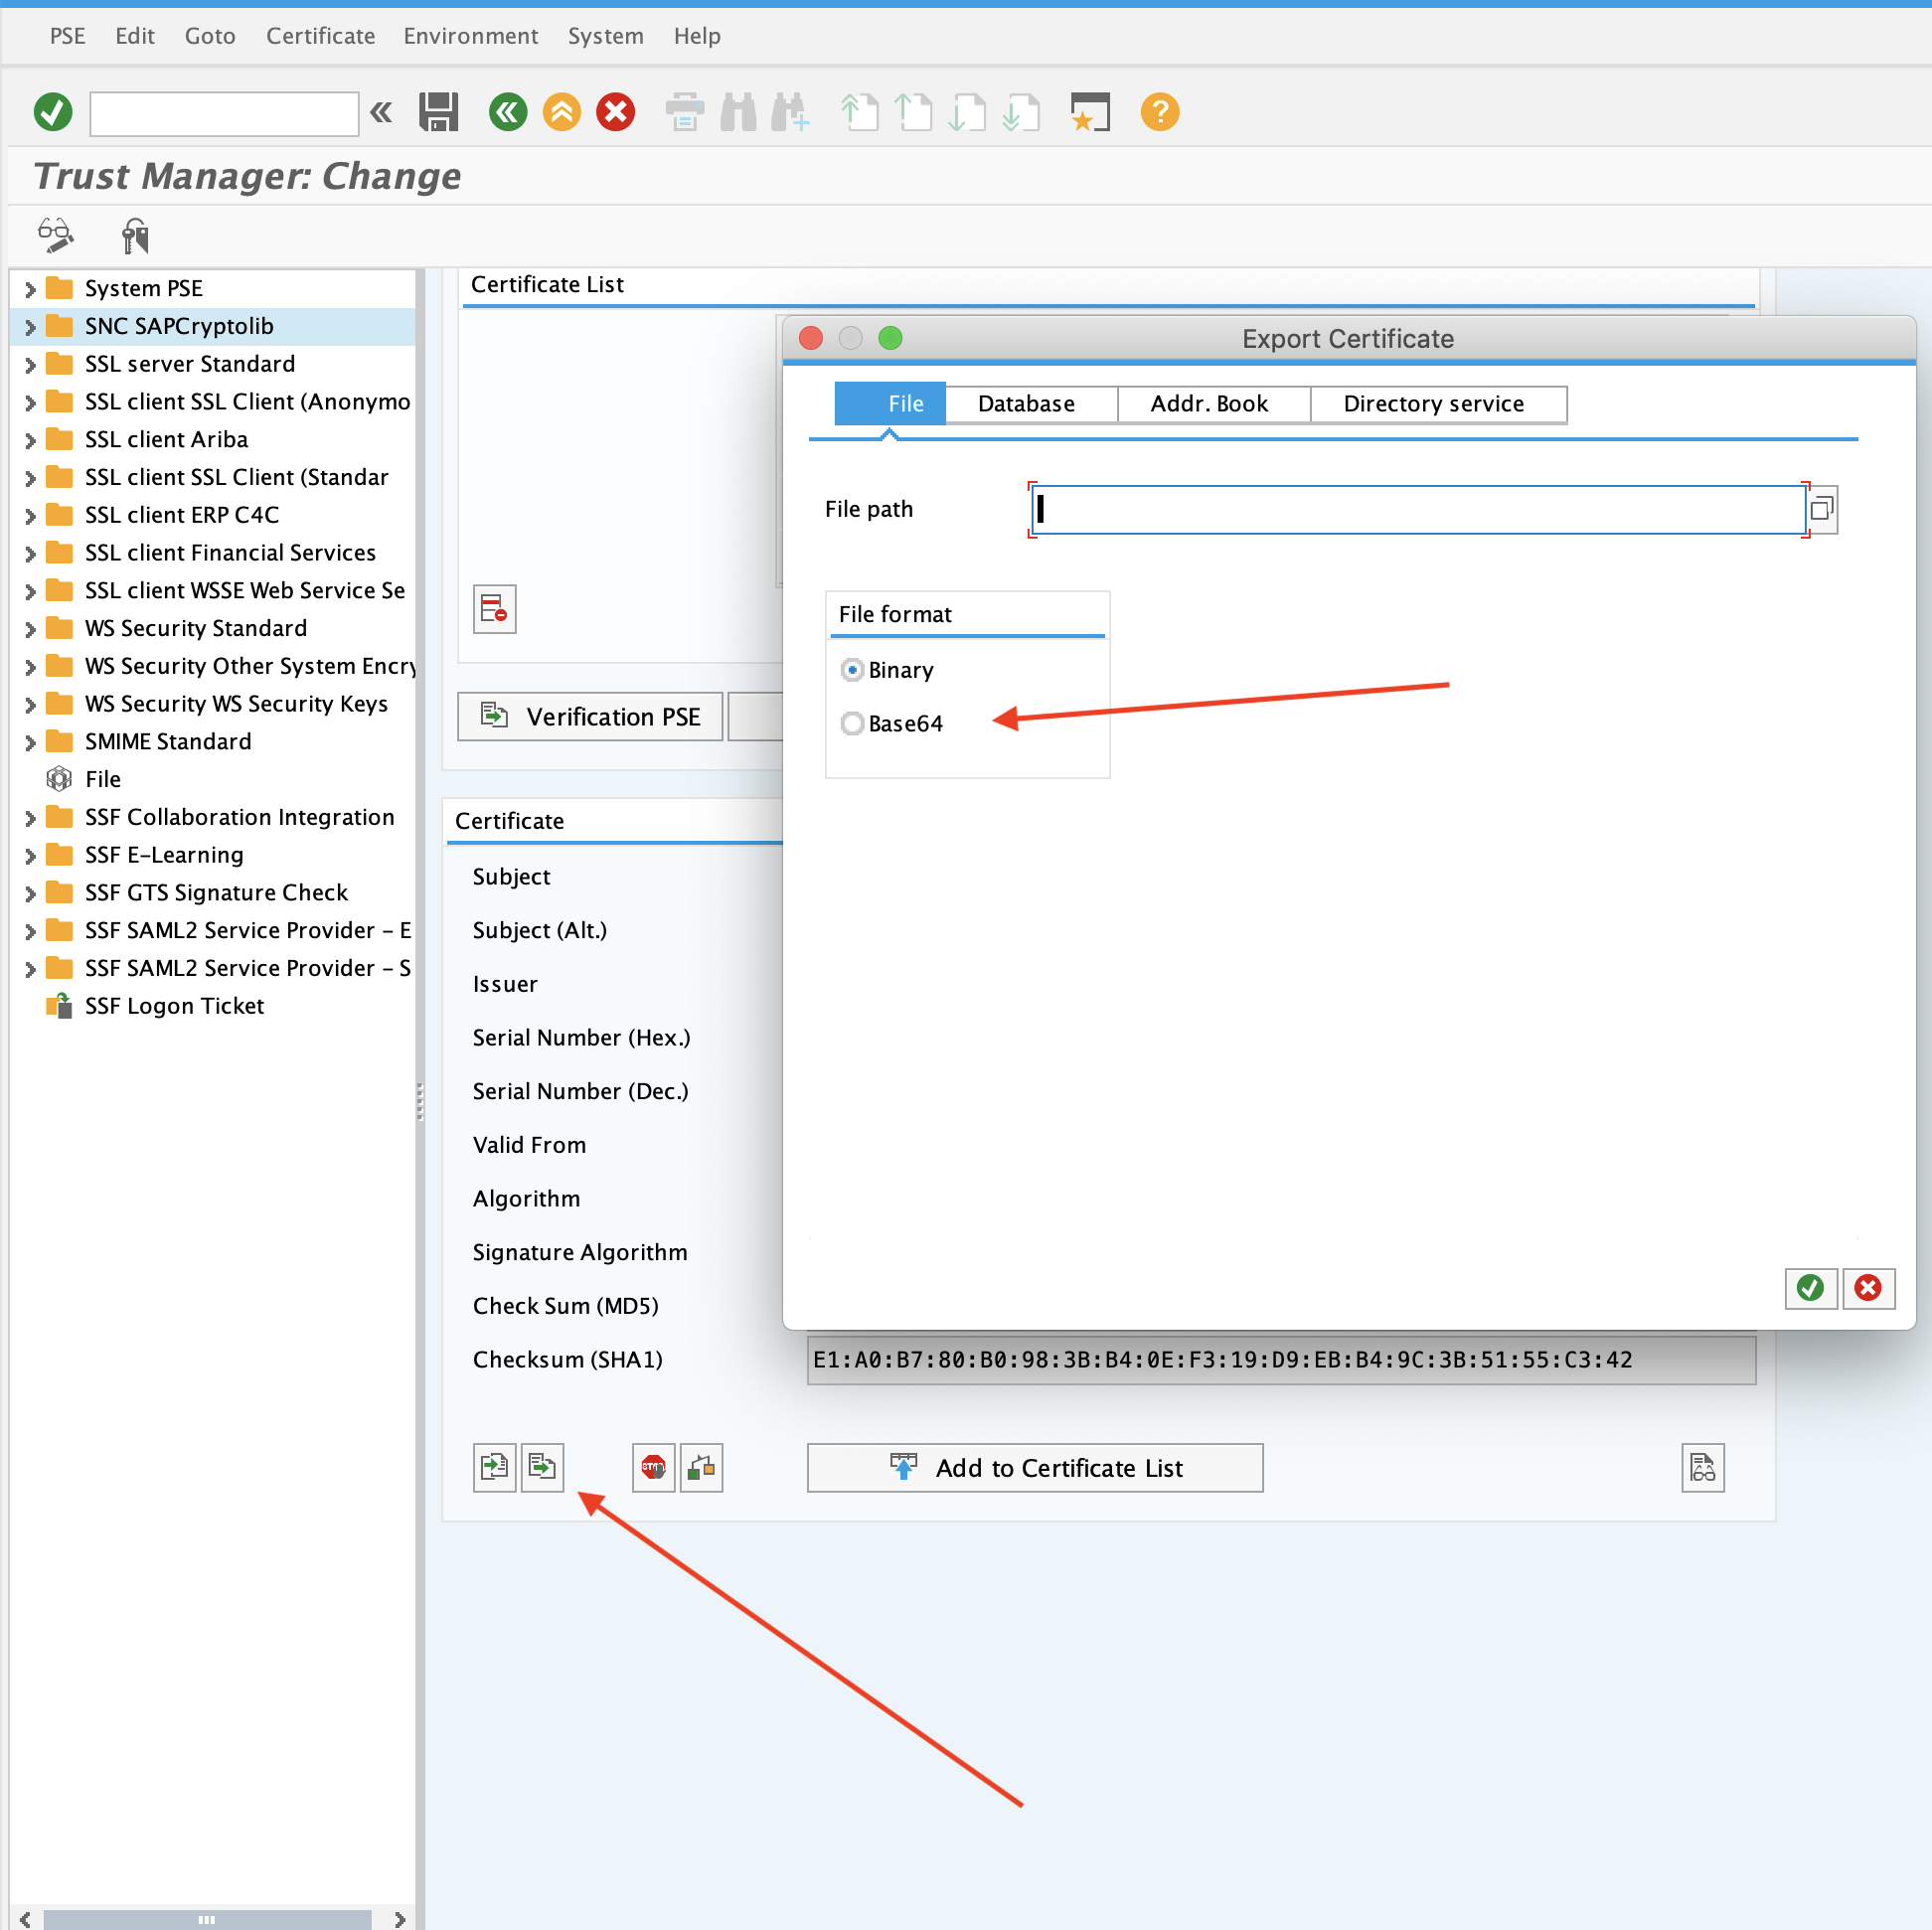
- Save this file at
root-ca.pemin thesecfolder you created in 3. In the case of linux, you will need to copy it over to your linux server.
Example Linux:
- Copy
root-ca.pemover tosecfolder Terminal input
scp root-ca.pem user@your_server:~/sec
# 6. Create and import certificates into your SAP system
We now need to create a certificate to import into your SAP system. Your OPA will use this to verify its identity and SAP also needs a copy to trust your OPA's attempt to connect. This can be done with sapgenpse.
Example Linux:
- Create a self-signed certificate using
sapgenpse. You will be prompted to provide a PSE PIN and the distinguished name of your PSE. In this example, we have given it the canonical nameworkato. Terminal input
./sapgenpse gen_pse -v -p ~/sec/workato.pse
Expected output
Got absolute PSE path "~/sec/workato.pse".
Please enter PSE PIN/Passphrase: ************
Please reenter PSE PIN/Passphrase: ************
get_pse: Distinguished name of PSE owner: CN=workato
 Supplied distinguished name: "CN=workato"
 Creating PSE with format v2 (default)
 succeeded.
 certificate creation... ok
 PSE update... ok
 PKRoot... ok
Generating certificate request... ok.
Certificate Request:
 Signed Part:
  Subject:                             CN=workato
  Key:                                 rsaEncryption (2048 bits)
  Attributes:                          None
 Signature:
  Signature algorithm:                 sha256WithRsaEncryption (1.2.840.113549.1.1.11)
  Signature:                           <Not displayed>

PKCS#10 certificate request for "~/sec/workato.pse":

-----BEGIN CERTIFICATE REQUEST-----
MIICVzCCAT8CAQAwEjEQMA4GA1UEAxMHd29ya2F0bzCCASIwDQYJKoZIhvcNAQEB
BQADggEPADCCAQoCggEBAM+lPXOoJTC1bDJfc7C4tsQDOmEDMwhLmL24Rxp2aXU9
+7UlZaG7QKVRJw6cRzCt2sPHyt5v1PrH9ZfavliMG71hrCQMx62Vft3p+upcM552
- You should now see a
workato.psefile in yoursecfolder. We now need to use this PSE file to create a cert. You will be prompted for the PSE PIN you gave moments earlier. This will create aworkato.crtfile in yoursecfolder. Terminal input
./sapgenpse export_own_cert -v -p ~/sec/workato.pse -o ~/sec/workato.crt
Expected output
Opening PSE "~/sec/workato.pse"...
 No SSO credentials found for this PSE.
Please enter PSE PIN/Passphrase: ************
 PSE (v2) open ok.
 Retrieving my certificate... ok.
 Writing to file (PEM-framed base64-encoded)... ok.
- Now we need to assign the credentials of the current OS user to this PSE. This can be done with
sapgenpseas well. Use this command if running OPA as a service. Your os username is different from your SAP username. This should be the name of your user in your server -ec2-userTerminal input
./sapgenpse seclogin -p workato.pse -O [your_os_username]
If you're running the OPA via command line, you can omit the user declaration.
./sapgenpse seclogin -p workato.pse
Expected output
running seclogin with USER="ec2-user"
Please enter PSE PIN/Passphrase: ************
Added SSO-credentials for PSE "~/sec/workato.pse"
- Now we need to export the
workato.crtto be imported into your SAP server. For linux, this can be done by copying it out of your linux server. This can be done viascpin your local machine.
scp user@your_server:~/sec/workato.crt ~/workato.crt
Now we need to import our certificates into SAP. Using the trust manager in the SAP GUI
- Go to the trust manager (T-code STRUST).
- Select the SNC PSE node. In the example below, we have it named as
SNC SAPCrytolib. - Go into edit mode.
- Choose Certificate import in the certificate section of the node.
- Select the
workato.certyou recently created. - The PSE information should appear in the PSE certificate section. (Base 64 format)
- Click Add to certificate list and click save.
# 7. Create SSO credentials
Now we need to create certificates for your OPA to authenticate it with your SAP system. We will need the following files:
- The
root-ca.pemretrieved in Step 5 which is the certificate of your SAP system. In the case of linux, this should be imported into your server and moved into yoursecfolder. - The
workato.pseretrieved in Step 6 which is the PSE which will be used by your OPA. In the case of linux, this should be imported into your server and moved into yoursecfolder if not already done so.
Example Linux:
- Now we need to link this
workato.pseto the SAProot-ca.pem. Usesapgenpseagain to link theworkato.psefile to theroot-ca.pem. This allows this PSE to know that the SAP system is trusted. You will need to enter the PSE PIN created earlier in Step 6.
Terminal line input
./sapgenpse maintain_pk -p ~/sec/workato.pse -a ~/sec/root-ca.pem
Expected output
Please enter PSE PIN/Passphrase: ************
 maintain_pk for PSE "~/sec/workato.pse"
----------------------------------------------------------------------------
Subject               :   CN=EH8, OU=I0021153659, OU=SAP Web AS, O=SAP Trust Community, C=DE

 PKList updated (1 entries total, 1 newly added)
- In the
secfolder, run the following command to check if theroot-ca.pemhas been linked successfully. Usesapgenpseto check if theroot-ca.pemfrom SAP has been linked successfully. Terminal line input
./sapgenpse maintain_pk -p ~/sec/workato.pse -l -v
Expected output
Opening PSE "~/sec/RFC.pse"...
 PSE (v2) open ok.
 retrieving PKList
PKList:
 Version:                              1
 Subject:                              [Subject of root-ca.pem]
 Issuer:                               [Subject of root-ca.pem]
 Serial Number:                        [Serial number of root-ca.pem]
 Validity not before:                  [Valid from of root-ca.pem]
 Validity not after:                   [Valid to of root-ca.pem]
 Public key:                           [Algorithm of root-ca.pem] [Key strength of root-ca.pem]
 Public key fingerprint (MD5):         [PK fingerprint MD5 of root-ca.pem]
 Signature algorithm:                  [Signature Algorithm of root-ca.pem]
 Certificate fingerprint (MD5):        [Check Sum MD5 of root-ca.pem]
 Certificate fingerprint (SHA1):       [Check Sum SHA1 of root-ca.pem]
 Certificate fingerprint (SHA256):     [Check Sum SHA256 of root-ca.pem]
- In the
secfolder, run the following commands to check if credentials are correct by checking that the client certificate, key, and SSO mapping Terminal line input
./sapgenpse seclogin -p ~/sec/workato.pse -O [your_os_username] -l
or below if using command line
./sapgenpse seclogin -p ~/sec/workato.pse -l
Expected output
 running seclogin with USER="ec2-user"
  0 (LPS:OFF): CN=workato
          (LPS:OFF): ~/sec/workato.pse
  1 readable SSO-Credentials available
  for PSE-file "~/sec/workato.pse"
Take note of the credentials in the output (CN=workato in this case).
# 8. Mapping an SNC user on SAP
Now we need to map these SSO credentials to an SNC users in SAP
Under TCode SU01, enter in the name of the SNC user assigned to Workato
Go to Tab SNC, enter in the SNC name. This is the credentials in step 7 with a
p:prepended too. In my example, this means the SNC name isp:CN=workato
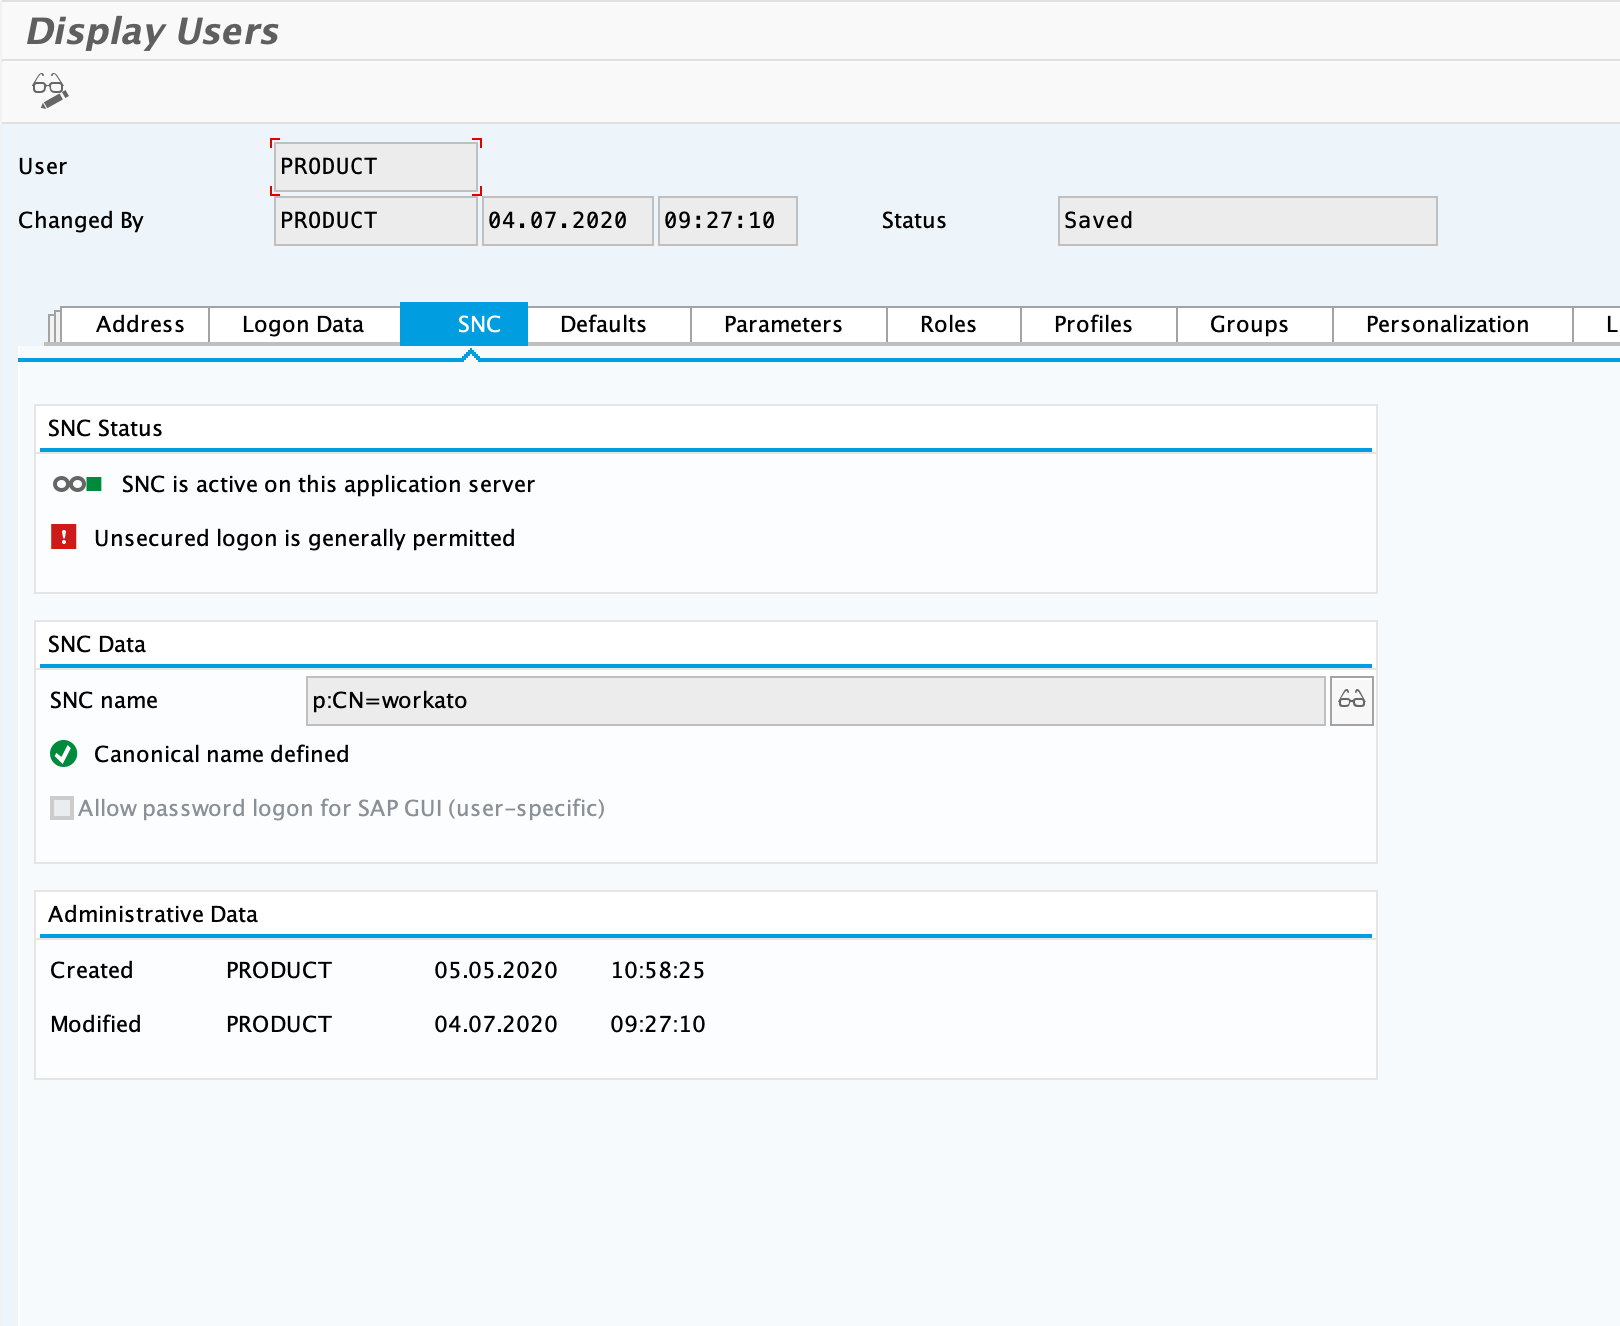
- Click save.
# 9. Set up your OPA configuration
If you haven't set up your OPA, do so now. Be sure to set up your SAP config format too. When you run your OPA, you should be able to enable SNC encryption.
server:
  classpath:
    - lib_ext

sap:
  sap_profile_1:
    network_connection:
      # replace this with message_server_host & logon_group if using message server connections
      gateway_host: xx.xx.xx.xx
      system_number: 00
      program_id: WORKATO
      # (Optional) SNC Quality of Protection (security level)
      # 0: No encryption (default). Use any other value if you want to authenticate and/or encrypt connections using SSL certificates
      # 1: Apply authentication only. When using authentication only, the system verifies the identity of the communication partners. This is the minimum protection level offered by SNC. No actual data protection is provided!
      # 2: Apply integrity protection (includes authentication). When using integrity protection, the system detects any changes or manipulation of the data, which may have occurred between the two end points of a communication.
      # 3: Apply privacy protection (includes integrity protection and authentication). When using privacy protection, the system encrypts the messages being transferred to make eavesdropping useless. Privacy protection also includes integrity protection of the data. This is the maximum level of protection provided by SNC.
      # 8: Apply global default protection. QoP value from the application server's snc/data_protection/use is used.
      # 9: Apply the maximum protection. QoP value from the application server's snc/data_protection/max is used.
      quality_of_protection: 3
      # Filesystem path to libsapcrypto.so (Linux), libsapcrypto.dylib (Mac) sapcrypto.dll (Windows)
      sapcrypto_library_path: /home/ec2-user/sec/libsapcrypto.so
      # Required when quality_of_protection is non-zero. SNC partner, for example, `p:CN=EH8, OU=I0021153659, OU=SAP Web AS, O=SAP Trust Community, C=DE`
      # Found in STRUST under SNC SAPCryptolib. Must be prepended with "p:"
      partner_name: p:[Subject of root-ca.pem]
    user_logon:
      client: 800
      language: EN
# 10. Alter your RFC destination (If you use the New IDoc trigger)
We now need to enable SNC for the RFC destination dedicated to Workato.
- Go to TCode SM59.
- Head over to the RFC destination dedicated to Workato.
- Select the
Logon & Securitytab. - Select the
SNCbutton under theSecurity Optionssection. - Enter in the quality of protection used in the SAP config in the OPA. In our case, this has been set to
3. - Enter in the same SNC name given to the Workato user earlier in SU01.In (opens new window) our case, this is
p:CN=workato.
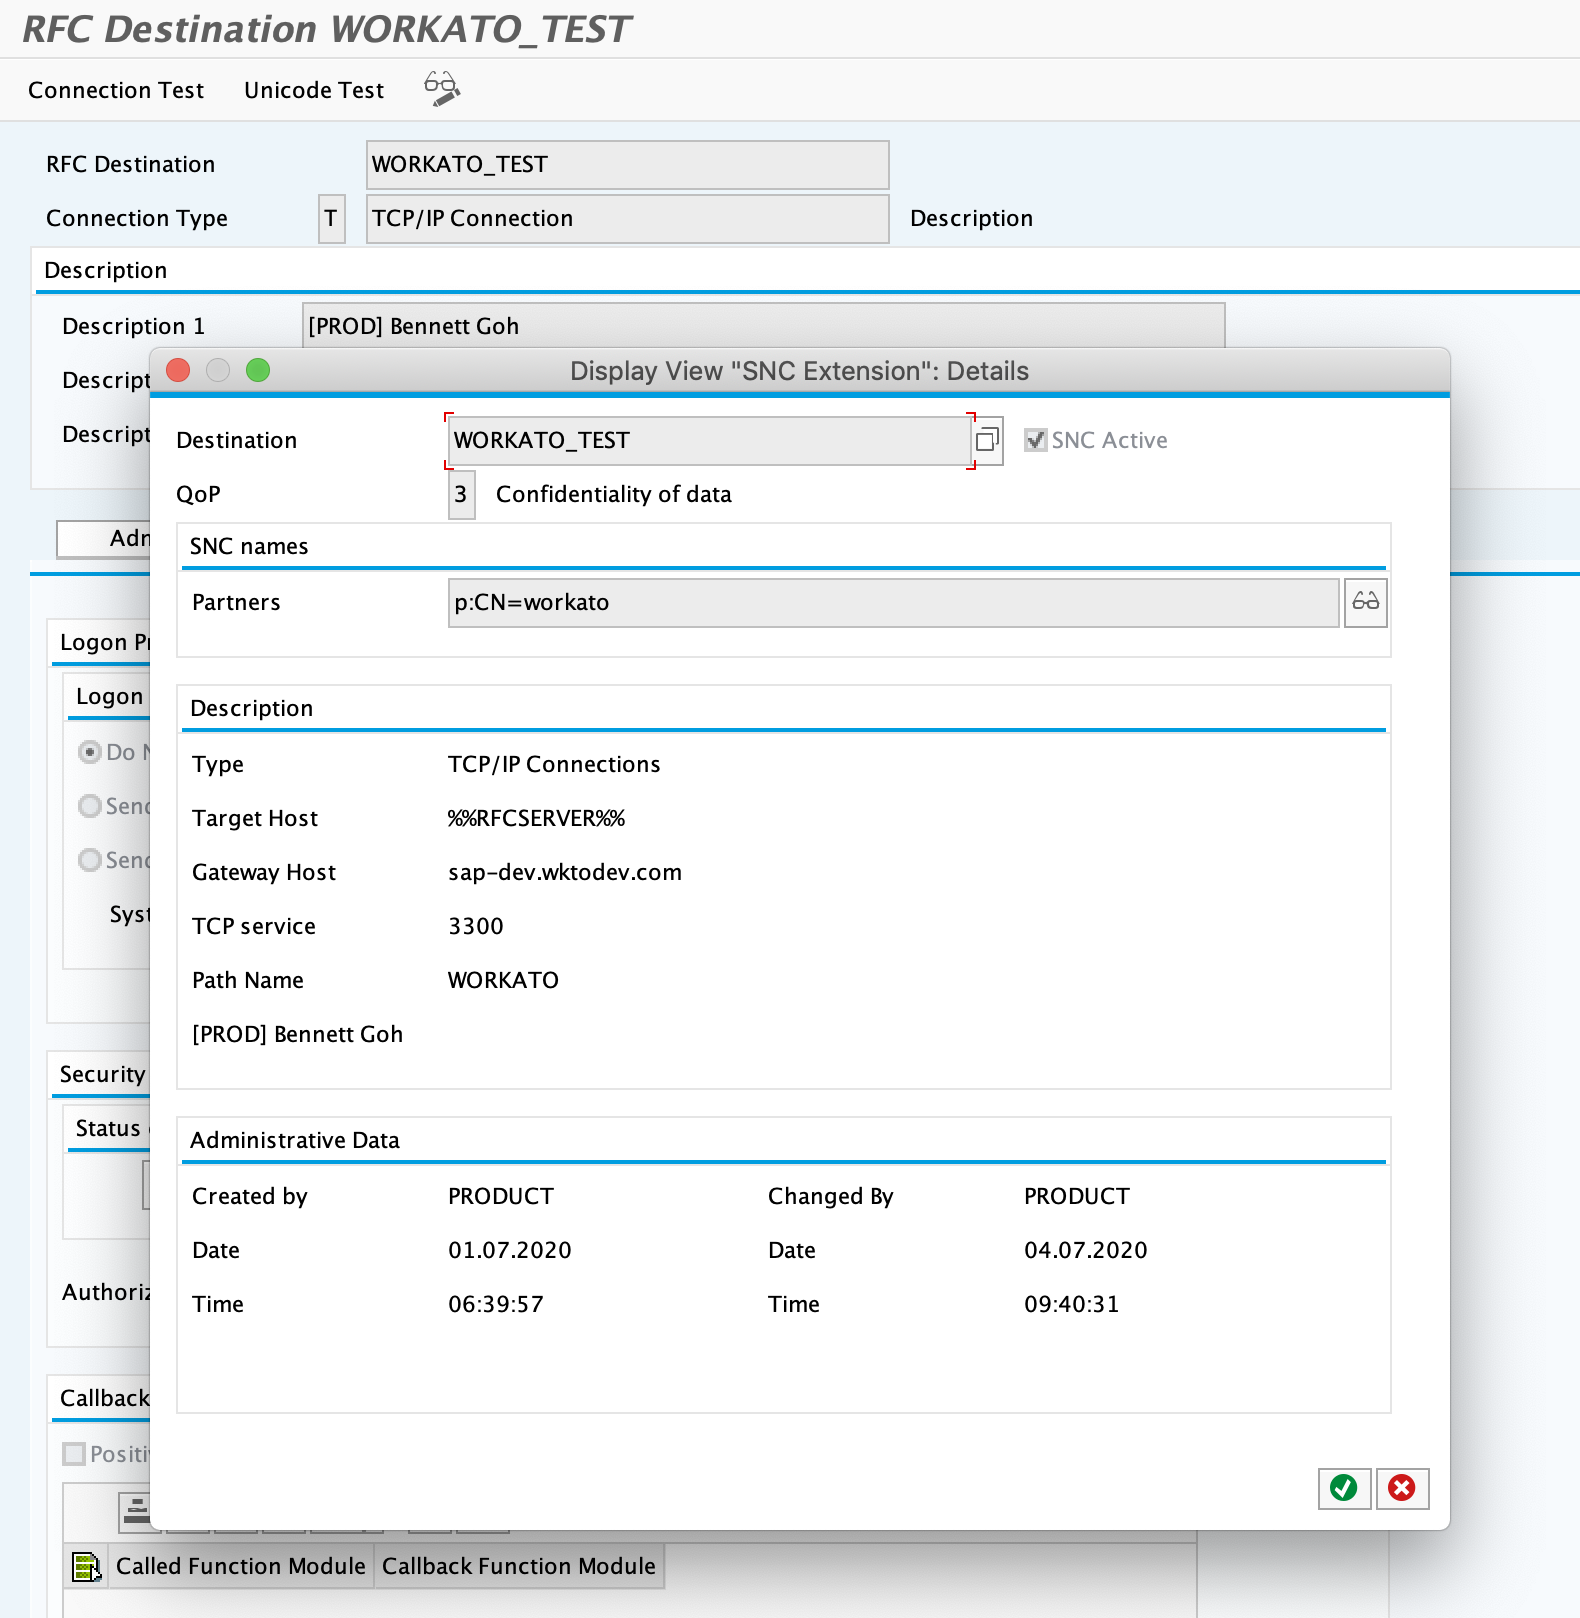
- Click save and you should be good to go!
# 11. Run your OPA and test
Congratulations! You have set up encrypted connections between your OPA and your SAP system. Coupled with TLS1.2 from Workato to your OPA, you now have End to End encryption for all communication between SAP and Workato.
# Troubleshooting
- When connecting to SAP, you see the following error:
SncPDLInit()==SNCERR_INIT
Unable to load GSS-API Shared Library
named "~/sec/libsapcrypto.so"
Check your config profile in your OPA. Be sure the sapcrypto_library_path parameter has the full path to your libsapcrypto library.
- When connecting to SAP, you see the following error in your OPA logs:
A2200210 Peer certificate verification failed
Check your trust manager configurations under Tcode STRUST. Be sure that your OPA's certificate has been imported and saved in your certificate list.
- When connecting to SAP, you see the following error in your OPA logs:
Could not find a suitable SAP user for the SNC name of the caller
Check that your SECUDIR environment variable has been set. This can be done via echo $SECUDIR. If this is the case, check the SNC name of your user in SAP under Tcode SU01.
Last updated: 4/6/2023, 9:36:27 AM